Deploying a Smart Contract on Soneium with Remix
Hey there! Today, I’m going to walk you through a fun and straightforward journey of deploying a smart contract on the Soneium testnet…

Hey there! Today, I’m going to walk you through a fun and straightforward journey of deploying a smart contract on the Soneium testnet using Remix.
Look at their back, this is a very promising project from Sony. And, it’s still very early.
It’s quick and easy. Before we start, if you’re wondering how I learned all of this, you can head over to Base. They have some great tutorials on how to write and deploy contracts with Remix and Solidity. After you complete each lesson, you can also mint an NFT. While these NFTs don’t have any financial value (at the moment), they can serve as a certificate of completion and give you a sense of accomplishment.

Back to our Soneium, let’s start.
1. Faucet
First things first, we need some test ETH. Head over to Sepolia Faucet. This is where we’ll get some free Sepolia ETH (SepETH) to play around with. Enter your wallet address, click on “Start Mining,” and wait for the faucet to fill your wallet with some SepETH. One more thing, you’ll also need a Gitcoin Passport.
url: https://sepolia-faucet.pk910.de/

After you start the faucet, it will begin mining. Let it mine until you have around 0.2 ETH, then you can stop. That should be enough for the next steps: bridging and contract deployment.
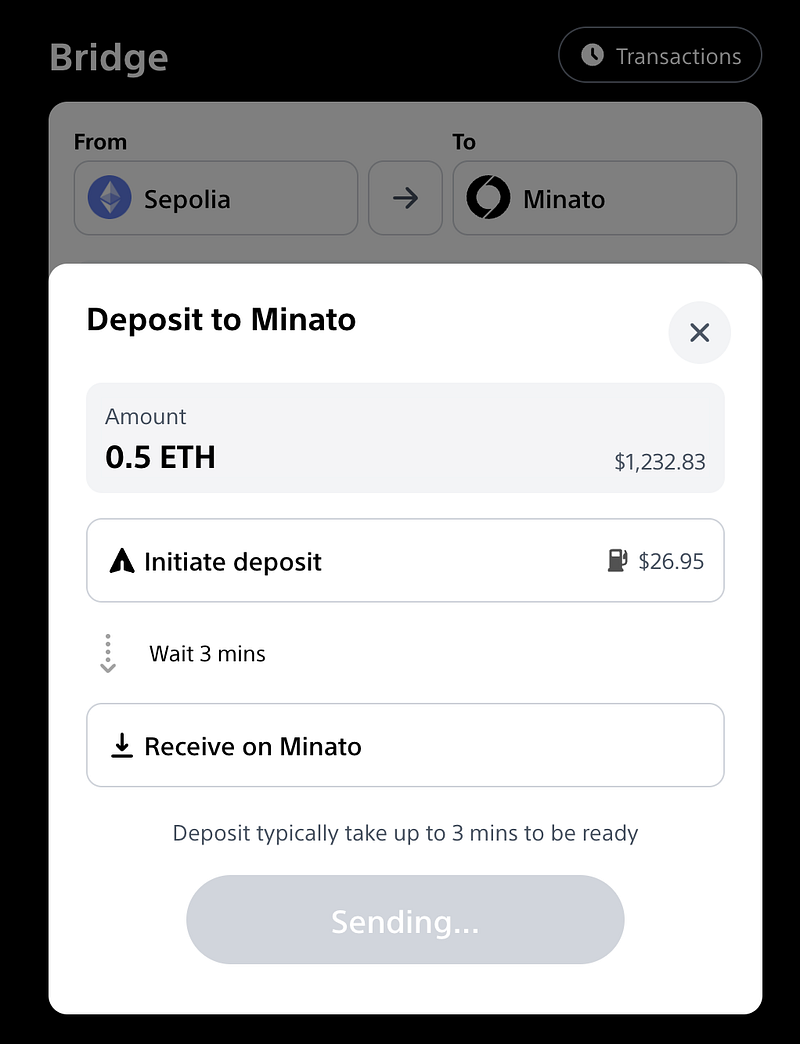
2. Bridge
Once you have the SepETH, it’s time to bridge those funds to the Soneium network. Go to the bridge interface, select Sepolia as the source, and Soneium as the destination. I transferred 0.5 ETH (trust me, 0.2 is more than enough), which took just around 3 minutes. Now, we are ready to write some code!
url: https://bridge.soneium.org/en/testnet
3. Write code Remix
If you are new to Remix, I recommend studying the Base tutorial mentioned above. Or, you can watch this youtube: https://www.youtube.com/watch?v=vH8T3In6ZkE
It’s easier than you might think, especially if you have any programming experience. In the picture below, I have created a new file in the contracts folder named HelloWorldSoneium.sol.
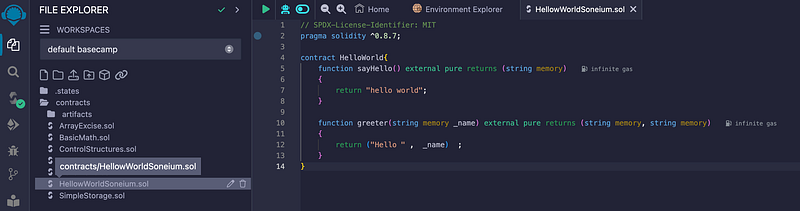
Here comes the fun part! Copy and paste this code:
pragma solidity ^0.8.7;

contract HelloWorld{
    function sayHello() external pure returns (string memory)
    {
        return "hello world";
    }

    function greeter(string memory _name) external pure returns (string memory, string memory)
    {
        return ("Hello " ,  _name)  ;
    }
}
This simple contract has two functions: sayHello returns a friendly greeting, and greeter takes a name as an input and returns a personalized greeting. Pretty straightforward!
4. Deploy contract
With our contract code ready, it’s time to deploy!
The image below shows that I’ve changed the environment to MetaMask, which will connect to your wallet. Be sure to select the wallet where you have bridged ETH to Minato (the Soneium testnet).

Hit the orange deploy button in Remix, it will ask you to approve the contract deployment trasaction.

Then, you should see something like this in remix:

Congratulations, the contract is now live on the Soneium testnet! 🎉
You can check out the details on the Soneium Explorer.
url: https://explorer-testnet.soneium.org/address/0xD3E0aaAb17D229c1B3A5a30037cF4b2a0f96d7Da

5. Test
Now that our contract is deployed, let’s test it out. We’ll start by calling the sayHello function.

call “sayHello” function, click at the “sayHello” button. You will get this result in Remix.

As expected, it returns “hello world”.
Next, we call the greeter function with a name input. Let’s put your name in the input box (string_name).
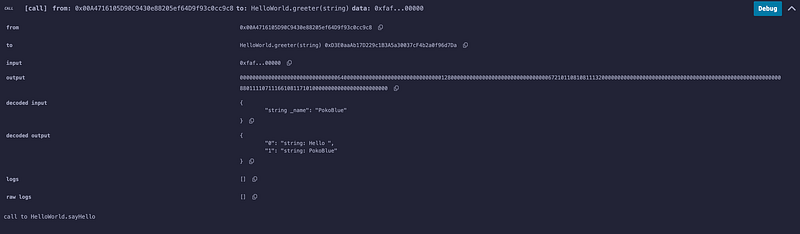
and voilà! It greets us with a friendly “Hello [yourname]”.
Summary
And there you have it! We’ve successfully deployed and tested a smart contract on Soneium using Remix. It’s as easy as that. Hopefully, this guide made the process a bit more approachable and fun for you. Until next time, happy coding!