Don’t Have a Fixed IP at Home for Running a Node? A Step-by-Step Guide to Get It with a VPS
Hey there! So, I’ve been running into this annoying issue at home. My internet connection doesn’t have a fixed IP address, and it’s been a…

Hey there! So, I’ve been running into this annoying issue at home. My internet connection doesn’t have a fixed IP address, and it’s been a pain for running my 0g_node. But then I thought, why not connect my home network to my VPS, which does have a fixed IP? By linking them together into one big network, I can take advantage of the VPS’s fixed IP.
In this guide, I’ll walk you through the entire process. In the big picture, here’s what we’re going to do:
- Set up OpenVPN at VPS
- Set up the VPS server for port forwarding (including firewall)
- Set up my guest machine running on KVM (at home) to connect to the VPS
More background
My home setup, where I run my nodes for airdrop farming, is on a fiber optic connection, but it lacks a fixed IP address. Initially, I thought about forking out $30 a month to my ISP for a fixed IP. But then I figured, why not use my VPS, which already has a fixed IP and is always on? Here’s how I made it happen.
1. Set up OpenVPN on the VPS
1.1 Install OpenVPN on the VPS
I worked with ChatGPT for a list of commands and steps to configure the OpenVPN. It took me more than six hours before I gave up. Then, I found the guide below, which worked like a charm. It only took few minutes, and it was done. Basically, this guy provided an automate script with a video guide that does many things for you.
Remember: After OpenVPN is up and running on your VPS, you will need to download the client config file (xxxx.opvn) to your computer at home. Keep this file secure both during and after the transfer.
1.2 Setup OpenVPN on the client side
Again, set up the client VPN by watching the video from the same guy. You will need those 4 files from step 1.1. After that, please connect and remember the IP of your client. In my case, my client IP is 10.8.0.2, which we will use later in the next step.
2. Enable IP Forwarding on VPS
2.1 Let’s jump into the scripts to enable IP forwarding
Edit the config file:
sudo nano /etc/sysctl.confThen, un-comment or add the line. Save.
net.ipv4.ip_forward = 1Then, apply change
sudo sysctl -p2.2 Config firewall
A firewall is always recommended. If you need to disable it, do so for testing purposes only. This is a one-time setup to allow our VPN to pass through the firewall.
Allow openVPN and SSH
sudo ufw allow 1194/udp
sudo ufw allow OpenSSH
Add a firewall rule
sudo nano /etc/ufw/before.rulesAdd these rules before the *filter section:
*nat
:POSTROUTING ACCEPT [0:0]
-A POSTROUTING -s 10.8.0.0/8 -o eth0 -j MASQUERADE
COMMIT
Note: This rule is designed to allow VPN clients (with IP addresses in the 10.8.0.0/8 range) to access the internet by masquerading (spoofing) their IP addresses as the IP address of the server’s eth0 interface. Adjust the network settings to match your own setup, but if you follow the YouTube video I provided above, you can simply copy and paste this as is.
2.3 Review openvpn server.conf file
The purpose of this configuration is to push the routing rules to the client so that it can communicate back to the server.
#edit the config file.
nano /ect/openvpn/server.conf
#all internet traffic go to the vpn server
push "redirect-gateway def1 bypass-dhcp"
#set routing rules in the client so that it can commnicate back
push "route 10.8.0.0 255.255.255.0"
#save and exitNote: These rules will be pushed to the VPN client immediately after the VPN connection is successful.
sudo systemctl start openvpn@server
sudo systemctl enable openvpn@server
Optional: Set static IP for client
In my case, I would like to set a static IP for my VPN client so that it aligns with the port forwarding rules (see below).
#Use nano to create the file (if the directory doesn't exist, create it first).
#The name of the client must match the name you used when generating the client previously.

sudo nano /etc/openvpn/ccd/ClientXXX

#inside file, speify IP addres. in my case, 10.8.0.11
ifconfig-push 10.8.0.11 255.255.255.0
2.5 Setting up Port Forwarding on the VPS
Add port forwarding rules
#specify each port here. If you would like to add
sudo iptables -t nat -A PREROUTING -p tcp --dport 8545 -j DNAT --to-destination 10.8.0.2:8545
sudo iptables -t nat -A PREROUTING -p tcp --dport 4567 -j DNAT --to-destination 10.8.0.2:4567

#The POSTROUTING (line below) add once and it will be applied to all port
sudo iptables -t nat -A POSTROUTING -s 10.8.0.0/8 -o eth0 -j MASQUERADE
The sample script above sets the port forward 8545 and 4567 to IP 10.8.0.2, which is my OpenVPN client. So, change the port and IP to fit your needs.
After that, save and enable these rules
Check out more detailed setup information at this link.sudo sh -c "iptables-save > /etc/iptables/rules.v4"All these command should works and you are ready to test it.
2.6 Optional: Tunnel Splitting
This sounds so fancy; basically, it is a way to improve latency and utilize the local network as much as possible, while allowing us to have a fixed IP in the VPN server.
Check out more detailed setup information at this link.
3. Test everything, work?
3.1 Test IP table added
run this command for NAT table at VPS
sudo iptables -t nat -L -v -nexpected result (the 2nd and 3rd line)

3.2 Test connectivity
This is the real moment. To prove everything works, I opened another computer, connected to the mobile network on my phone, which is a different network from my home, and ran this command.
telnet 10.8.0.2 8545If everything works, the expected result should be look like this.
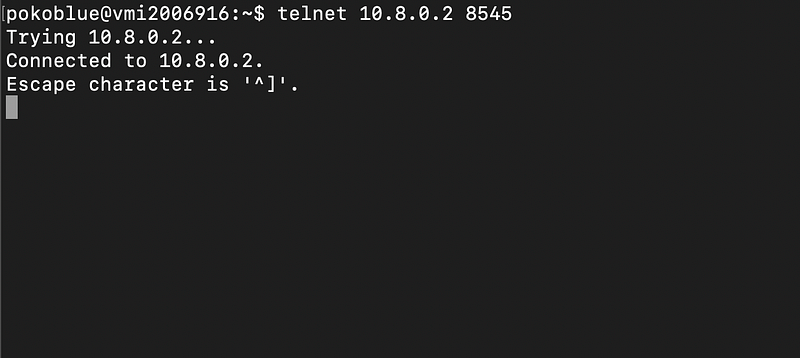
If not, you will not get any response back like this. Then, timed out.

Congratulations! If you’ve made it this far, I hope you’ve successfully set up your VPN and port forwarding.
The reason behind all this effort is the scalability cost on the cloud when running nodes for airdrops. Node airdrops are short-lived, usually lasting only 1–2 months. After the airdrop, we simply delete them. While VPS is good, it doesn’t work well with virtual machines since it might already be beyond that stage. Also, if we want to scale out to expand capacity, the price isn’t very attractive. Airdrops often require a bit of luck, and we can’t expect huge returns every time — sometimes we win, sometimes we lose.
On the other hand, scaling out our home computer costs less in the long run, and we own the asset. For example, if I want to add 1TB of NVMe storage for a month, it costs about the same as purchasing an NVMe stick and installing it on my computer.
If you have the skills to install OpenVPN and set up port forwarding, I’m confident you’ll be able to maintain and monitor your server at home. And it’s not mission-critical — if something goes down, it’s okay. Just fix it in the evening after your IRL meeting.
Now we have the power at home for running new testnets and nodes. Thank you for reading, and good luck with your airdrop journey.