Getting Two KVM Guests on Different Host Machines to Communicate
Before we dive in, I want to give a shoutout to this guy. His teaching is exceptional, and if you want to dig deeper into the details…
Before we dive in, I want to give a shoutout to this guy. His teaching is exceptional, and if you want to dig deeper into the details, definitely check out his video here:
Important:
You can’t set this up using a Wi-Fi interface — it simply won’t work (trust me, I’ve tried). You’ll need to connect the two computers using a LAN cable or a network switch.
Background
Normally, nodes in each project don’t communicate with each other, but you might need this kind of setup when there are multiple components or services that need to be installed on different machines. In my case, I accidentally installed the 0G validator node in one VM and the 0G DA in another VM, and these two VMs are on different physical servers. That’s where the problem arose.
Another reason for this setup is that I wanted to use Grafana and Prometheus to monitor all the nodes running in VMs on each host. However, I encountered a problem when trying to monitor guest machines on different hosts. Additionally, I faced another challenge: I couldn’t SSH directly into the guest machines from another computer — I had to first SSH into the host and then into the guest, which was a bit of a hassle.

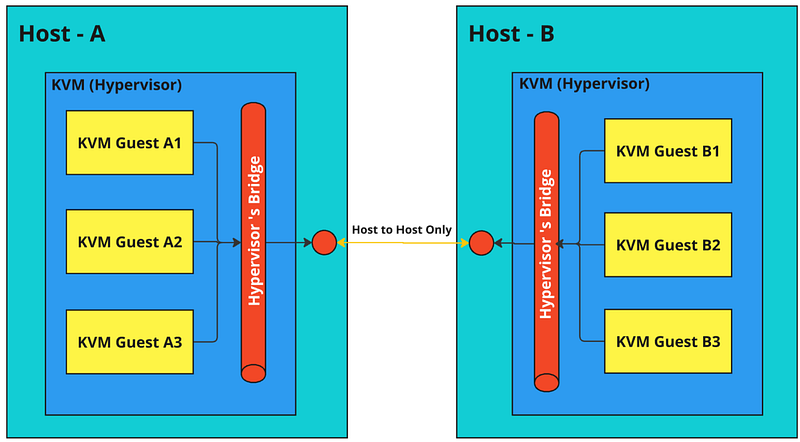
As you can see from the diagram, my initial thought was that configuring the network would be straightforward — just set up IP addresses within the same subnet, and everything should work like a charm. But, it turned out to be more complicated than that.
Hypervisor Bridge Limitation
The network setup inside these VMs involves an internal bridge within each VM host (the hypervisor) that manages communication between the guests and the host itself. However, this internal bridge doesn’t extend its communication to other hosts (at least, not as far as I know). See the picture below zoom in to see more detail
What we are going to do?
So, to get around this limitation, we need to create a bridge outside of the VM (hypervisor). This external bridge will act as a common connection point for both the host and every guest VM. By doing this, we can enable seamless communication between the KVM guests on different hosts, effectively bypassing the limitations of the internal bridges.

Let’s dive into the configuration!
1. Clean up
Before we begin, the first step is to clean up any existing settings. This includes removing the Hypervisor Bridge that might already be in place. Clearing out these old configurations ensures we start with a clean slate, avoiding any potential conflicts later on.
Caution: Before proceeding, be aware that executing these steps will disconnect your host and all clients from the internet or any network. If you’re remotely connected to the host, make sure you have access to the console to log in directly, as you won’t be able to reconnect remotely once the network settings are changed.
#destroy default networkon virsh (virtual machine)
virsh net-destroy default

#take down the link down (enp4s0 is the interface of my LAN)
sudo ip link set enp4s0 down

#remove ipaddress from enp4s0 (in this case, my ip is 192.168.1.125)
sudo ip addr del 192.168.1.125/16 dev enp4s0

#turn off all network management
## NetworkManager
sudo systemctl status NetworkManager
sudo systemctl stop NetworkManager

## systemd-networkd
sudo systemctl status systemd-networkd
sudo systemctl stop systemd-networkd
2. Configuration bridge
For this configuration, we’ll use systemd-networkd because it simplifies the setup and automatically recreates these network settings every time you reboot. This was a bit of a surprise for me, coming from the Windows world where network configurations tend to persist by default. Linux, however, handles things a bit differently.
2.1 Navigate to /etc/systemd/network
cd /etc/systemd/network/2.2 Setup
Once you’re in the /etc/systemd/network directory, we’ll create three configuration files to set up the network:
- 10-br0.netdev (Bridge)
- 20-enp4s0.network (Interface Binding)
- 30-br0-IP.network (Interface Configuration)
Here’s how each file should be configured:
1st File: 10-br0.netdev (Bridge Configuration)
[NetDev]
Name=br0
Kind=bridge
2nd File: 20-enp4s0.network (Interface Binding)
This file binds your network interface to the bridge. If your network interface name is different, replace enp4s0 with the correct name. You can check the correct name by using the ip a command.
Name=enp4s0

[Network]
Bridge=br0
3rd File: 30-br0-IP.network
This file configures the bridge interface with a static IP address, DNS, and gateway settings.
[Match]
Name=br0

[Network]
Address=192.168.1.10/24
DNS=192.168.1.1
Gateway=192.168.1.1
IPForward=yes
2.3 Enable and Start systemd-networkd
After creating the configuration files, the next step is to enable and start the systemd-networkd service. This ensures that the network configuration is applied and persists across reboots.
Run the following commands:
sudo systemctl enable systemd-networkd
sudo systemctl start systemd-networkd
These commands will enable systemd-networkd to start automatically on boot and apply the network settings immediately.
2.4 Verify Your Setup
At this point, your host should be ready. To ensure everything is working correctly, try pinging the gateway and an external network from the host.
Run the following commands:
ping -c 4 192.168.1.1  # Replace with your gateway IP
ping -c 4 8.8.8.8      # Ping an external network (Google's public DNS server)
If you receive responses, it means your network configuration is set up correctly, and your host is successfully connected to the network.
3. Configure Each Guest Machine to Use the New Bridge
At this point, if you access your guest machine’s console, you’ll notice that it can’t communicate with any other machines. This is because we removed the hypervisor bridge in step 1.
So, we need to configure each guest machine to use the new bridge (br0) that we set up on the host. Here’s how you can do it:
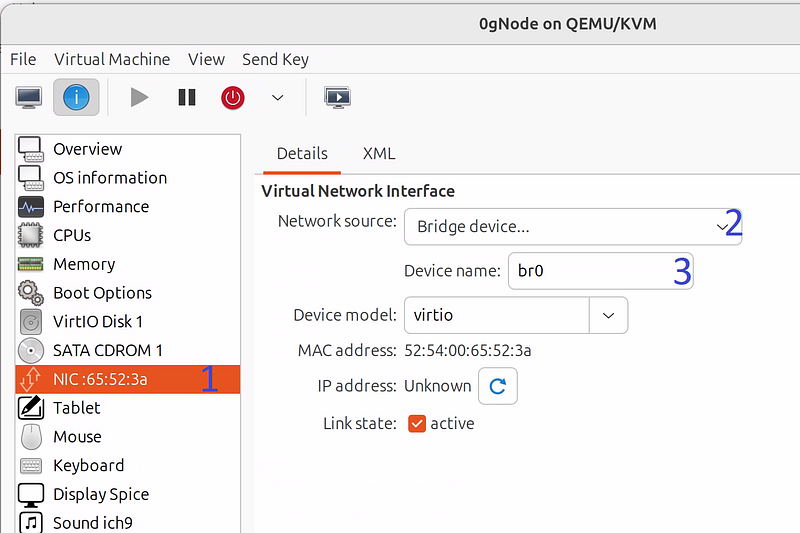
- Select your network interface
- Select “Bridge device…”
- Specify “br0” in Device name
After making the changes, click Apply and restart your VM. Once the guest machine is up and running after the reboot, its IP address should be automatically assigned via your network’s DHCP — typically handled by your Wi-Fi router or fiber modem.
In my case, I prefer to assign fixed IPs for each guest machine so that I can easily remember which IP belongs to which guest.
Summary
In this guide, we set up two KVM guest machines on different hosts to communicate, with the goal of enabling network monitoring using Grafana and Prometheus, and simplifying SSH access.
- Clean Up: We removed existing network settings, including the hypervisor bridge, to start fresh. We noted that this would disconnect the host and guests from the network, so console access was recommended.
- Host Machine Setup: We used
systemd-networkdfor easier configuration and to ensure settings persist across reboots. Three configuration files were created (10-br0.netdev,20-enp4s0.network,30-br0-dhcp.network) to set up and bind a network bridge (br0). Afterward, thesystemd-networkdservice was enabled and started to apply the new network settings. - Guest Machine Configuration: We configured each guest to use the new bridge and, after rebooting, ensured IPs were assigned via DHCP. Fixed IPs were suggested for easier management.
This setup allows seamless communication between KVM guests on different hosts, making monitoring and SSH access more efficient. Thank you for reading!!!