How to run Story Protocol Node (EP3)
Hey fam! So, I just successfully updated the story protocol node, and let me tell you, it was quite a challenge — but I make it easy for…

Hey fam! So, I just successfully updated the story protocol node, and let me tell you, it was quite a challenge — but I make it easy for you.
1. Download Binary
To get started, there are two client binaries we need for running the story node. I’ve organized the folder structure like this to keep things neat and easy to manage.
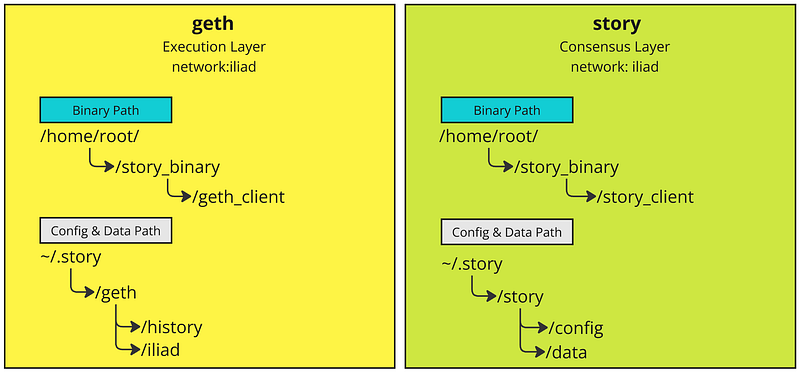
At this step, we’ll focus on building the binary path (the blue boxes) for both clients. Don’t worry about creating the configuration and data paths (gray box); they will automatically generate when we run the binaries. However, we’ll need to grab some info from them later on.
#cerate new path
mkdir story_binary
cd story_binary

#create two path
mkdir geth_client
mkdir story_client

#download geth
wget https://story-geth-binaries.s3.us-west-1.amazonaws.com/geth-public/geth-linux-amd64-0.9.2-ea9f0d2.tar.gz

#download story
wget https://story-geth-binaries.s3.us-west-1.amazonaws.com/story-public/story-linux-amd64-0.9.11-2a25df1.tar.gz


#extract story
tar zxvf story-linux-amd64-0.9.11-2a25df1.tar.gz --strip-components=1 -C story_client

#extract geth
tar zxvf geth-linux-amd64-0.9.2-ea9f0d2.tar.gz --strip-components=1 -C geth_client
Once you’ve extracted the files, you’ll have both clients ready for the next step.
Step 2: Node Configuration & Run
Alright, let’s move on to configuring and running the node. To keep things organized and manageable, I’m using screen to manage the session.
Step 2.1: Load Story Consensus (Iliad) Configuration
#create new screen session for story
session -S iliad

#make sure run in the story_client directory
cd /user/root/story_binary/story_client

#load config --> change moniker to your moniker name
./story init --network iliad --moniker pokoblue

#run!!!!
./story run
The consensus layer should not take too long to sync. However, remember to run it in parallel with the execution client (which we’ll cover in Step 2.3). From what I understand, “Iliad” will handle the creation of blocks and allow the execution layer to insert the payload blocks into them.

After you execute the command to run the Story consensus client, let’s detach from the current session. This will keep the client running in the background while we move on to set up the Geth client.
To detach from the session, simply press Ctrl + A, then D.
Step 2.3: Run Geth — Execution Layer
Now, it’s time to set up and run the Geth client, which acts as the execution layer for our node. The process for this is quite straightforward, but be prepared — it can take some time to fully sync.
#create new screen session for story
screen -S geth

#make sure run in the story_client directory
cd /user/root/story_binary/geth_client

#run !!!
./geth --iliad --syncmode full
In my case, it took around 5–6 hours to sync from the start. Since this is a full sync, it may take longer as the blockchain continues to grow. However, according to the documentation, there is also a SNAP option that might offer faster sync times, but it wasn’t available at the time of writing.
If your node syncs successfully, you should expect to see output logs indicating the progress. Keep an eye on the terminal for any errors or updates on the sync status.
If your node synced completely, you should expect to see something like this:

Step 3: Create a Validator
Once your Geth client (the execution layer) has finished syncing, you’re ready to start creating your validator.
Step 3.1: Get Faucet Funds
To create a validator, you’ll need $IP. You can follow the official guide to get the faucet from this link: Story Foundation Faucet Guide.
After you’ve get the $IP, you’ll need to send them to your validator address, which we’ll get it in step 3.2. I personally used MetaMask to send the funds to my validator address0x984586Db2d04952BF7228D33dEE04F5B2B978aFd.
Step 3.2: Get Your Validator Address
When you first started running the Story (Iliad) consensus client, the log output should have displayed your validator address. However, if you missed it (as I did), don’t worry — we can retrieve it again with a few simple commands.
Here’s how to find your validator address:
#goto story binary path
cd /user/root/story_binary/story_client

#export the public key
./story validator export
This command will output your public key. Make sure to note it down — you’ll need it later. Most of the time, you will require the base64-encoded compressed public key.
You’ll also need the private key to create the validator. The following command will help you extract the private key and store it securely in a .env file:
./story validator export --export-evm-key --evm-key-path .envNow you have both your public and private keys ready for the validator setup!
Step 3.3: Create Your Validator
This is the moment of truth — if this step succeeds, you’ll officially become a node validator.
# this equal to create validator with 1 IP
./story validator create --stake 1000000000000000000
My result is:

After successfully creating your validator, you may want to see it listed on the website. But first, we’ll need the validator address. Follow this command:
#cd
cd ~/.story/story/config

#get your consensus address for serach
cat priv_validator_key.json | grep address

# my output   "address": "E90F7BF21549C509F05FD9734D79A803FEC1376B",
#replace E90F7BF21549C509F05FD9734D79A803FEC1376B with your result
#sear
After obtaining your validator address, you can verify it in any web browser:
https://testnet.story.explorers.guru/validator/E90F7BF21549C509F05FD9734D79A803FEC1376B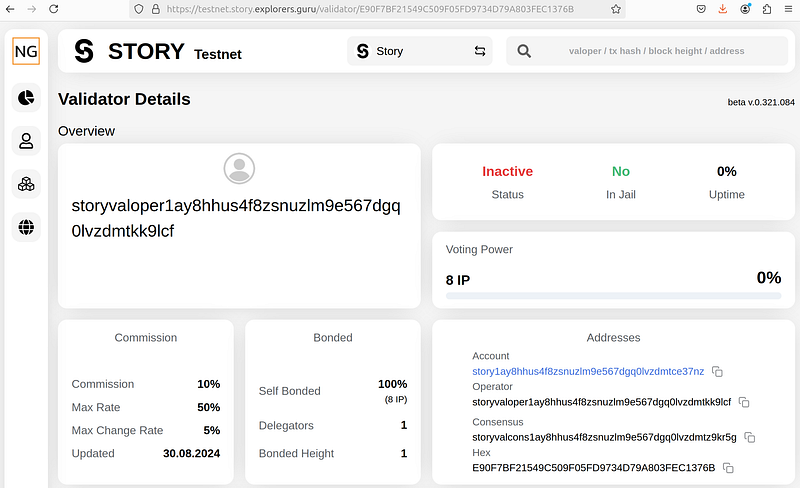
Congratulation!!!!
3.4 Stake Validator
In case you want to stake in the future.
#this is my stake validator, change the address to your validator, it stake 1 IP
./story validator stake   --validator-pubkey A0Vj/bVt59+qx6GPOKkneK4Olg67SjHOr/Xd0d3yMuH7   --stake 1000000000000000000
That’s all for today! I hope you enjoy running your node.