How I Failed to Migrate My Validator and How I Fixed It?
This article is divided into two parts. The first part shares how I failed to migrate the 0g node, and the second part explains how to do…

This article is divided into two parts. The first part shares how I failed to migrate the 0g node, and the second part explains how to do it properly. Feel free to jump to the second part if you want a quick reference.
However, if you don’t want to make the same mistakes as I did, I recommend reading the first part as well. It will take less than 3 minutes but could save you hours of trouble.
1. How I failed to migrate the 0g node?
Recently, my Og Node unexpectedly turned active after being on the inactive list for a long time. I believe this happened due to instability in some of the VPS service providers. It causing several nodes to go inactive, giving my node a chance to become active. Here is the popup message I received on Discord:

That sounded like good news; however, it turned out to be one of my bad days. We all know that being an active validator may gives you a higher chance for airdrops, which is what everyone running a node aims for. However, after my node became active for a while, I noticed something strange about my uptime. It turned out that my validator uptime kept decreasing. I tried my best (in a bit of a panic) to adjust everything. My block sync was fine. It can sync fast enough to get the latest block. My CPU, RAM, and network utilization were more than enough, but I couldn’t figure out why the uptime kept reducing. In the end, after 3 hours, my node became jailed and inactive.


After that, I used a command to check the signing info. Actually, I wasn’t sure what to expect. I just tried different commands to see if I could find any clues to fix the issue. Here is the result.
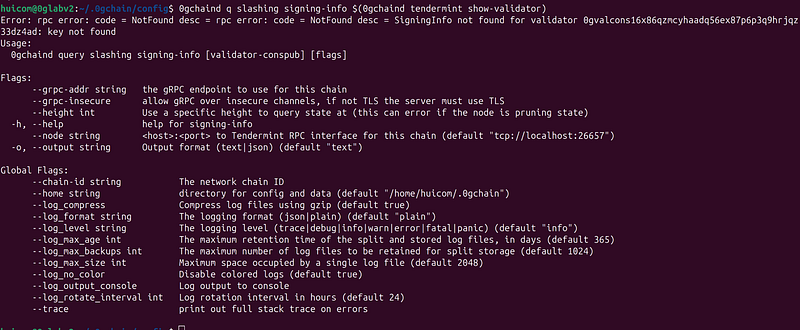
“SigningInfo not found… Key not found”
At first, this seemed fine, but it turned out to be the root cause of a serious issue.
ChatGPT: The mismatch between the two keys suggests that the key currently used by your node (anw---Key in node ---k23q)is not the same as the key that the blockchain network associates with your validator (P3d--- key on chain---Hnt3). This discrepancy can explain why theSigningInfowas not found when querying for your validator, as the key you used in the command to query the signing info does not match the one registered for your validator in the blockchain.
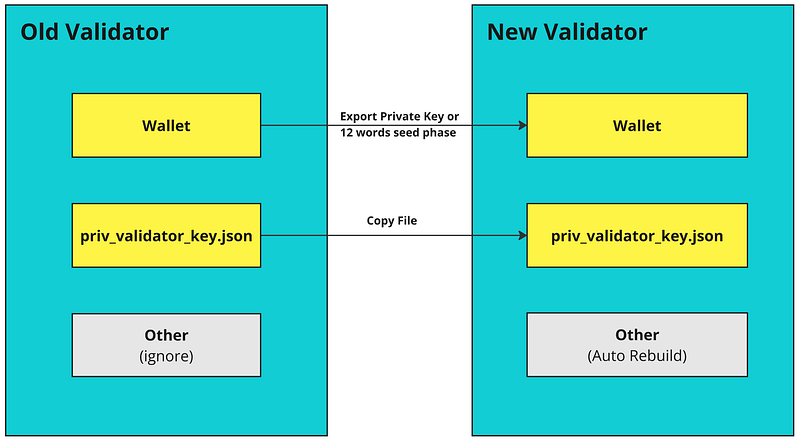
Few weeks ago, I had migrated my node. My understanding at the time was that I needed to back up certain keys, which I did, but I only backed up my wallet key. However, I didn’t back up the validator node key. “priv_validator_key.json”
Inside priv_validator_key.json, there are both the public key and private key required for the node to sign every blockFor migration, both keys need to be backed up and restored on the new server, but I only had one of them. So, what next? I tried using ChatGPT to fix this, but in the end, it confirmed that there was no way to restore or change the validator key.
The only option was to build a new one. It felt like having a meme coin that went up 50x but missing the chance to sell, and then it crashed to zero. My node was active but couldn’t sign any blocks. Then, it turn into inactive every 2–3 hours, which made it essentially useless.
This was a hard lesson learned. The entire process vividly illustrated what is truly important in validator node migration: you need both the wallet and validator keys.
But I didn’t give up. I built my new 0g validator node, sync to the latest block (using snapshot), created a new wallet, and set up a new validator. Voila! My node became active. This time, it successfully signed blocks — check the green status in the picture below.

I didn’t stop there. I wanted to ensure that if I need to migrate again, I will be able to do it properly. Here are the steps.
2. How I migrate my 0g validator node (properly) ?
Migrating your node is quite straightforward. Assuming you already know how to install it, this section will focus on the migration process.
As always, the validator guide from J Node (Joseph Tran) is my top recommendation. All of the code below uses it as the reference. You can check their website here: https://service.josephtran.xyz/testnet/zero-gravity-0g/validator-node/installation
2.1 Install all required binary and dependencies
# common dependencies
sudo apt update
sudo apt install curl git make jq build-essential gcc unzip wget lz4 aria2 -y

# go
cd $HOME && \
ver="1.22.0" && \
wget "https://golang.org/dl/go$ver.linux-amd64.tar.gz" && \
sudo rm -rf /usr/local/go && \
sudo tar -C /usr/local -xzf "go$ver.linux-amd64.tar.gz" && \
rm "go$ver.linux-amd64.tar.gz" && \
[ ! -f ~/.bash_profile ] && touch ~/.bash_profile && \
echo 'export PATH=$PATH:/usr/local/go/bin:$HOME/go/bin' >> ~/.bash_profile && \
source ~/.bash_profile && \
go version

#Install Binary
cd $HOME
rm -rf 0g-chain
git clone https://github.com/0glabs/0g-chain.git
cd 0g-chain
git checkout v0.3.1
git submodule update --init
make install
0gchaind version
2.2 Set environment variable
There are two variable that you have to replace.
WALLET = <specify_any_wallet_name> I always use “wallet”
MONIKER=<specify_you_validator_name>
echo "export WALLET='specify_any_wallet_name'" >> $HOME/.bash_profile
echo "export MONIKER='specify_you_validator_name'" >> $HOME/.bash_profile
echo "export OG_CHAIN_ID='zgtendermint_16600-2'" >> $HOME/.bash_profile
echo "export OG_PORT='26'" >> $HOME/.bash_profile
source $HOME/.bash_profile
2.3 Initialize node
At this step, it will generate a lot of files in .0gchain directory. One of them is “priv_validator_key.json” which we will come back later for this.
rm ~/.0gchain/config/genesis.json
wget -P ~/.0gchain/config https://github.com/0glabs/0g-chain/releases/download/v0.2.3/genesis.json
2.4 Other Setting
#Port Settting in app.toml
sed -i -e "
s%:1317%:${OG_PORT}317%g;
s%:8080%:${OG_PORT}080%g;
s%:9090%:${OG_PORT}090%g;
s%:9091%:${OG_PORT}091%g;
s%:8545%:${OG_PORT}545%g;
s%:8546%:${OG_PORT}546%g;
s%:6065%:${OG_PORT}065%g
" $HOME/.0gchain/config/app.toml

#Port Settting in config.toml
sed -i -e "
s%:26658%:${OG_PORT}658%g;
s%:26657%:${OG_PORT}657%g;
s%:6060%:${OG_PORT}060%g;
s%:26656%:${OG_PORT}656%g;
s%^external_address = \"\"%external_address = \"$(wget -qO- eth0.me):${OG_PORT}656\"%;
s%:26660%:${OG_PORT}660%g
" $HOME/.0gchain/config/config.toml

#Seed & Peer
SEEDS="[email protected]:26656,[email protected]:26656,[email protected]:26656,[email protected]:26656,8f21742ea5487da6e0697ba7d7b36961d3599567@og-testnet-seed.itrocket.net:47656"
PEERS="[email protected]:12656,[email protected]:12656,[email protected]:12656,[email protected]:12656,[email protected]:12656,[email protected]:12656,[email protected]:12656,[email protected]:12656,[email protected]:12656,[email protected]:12656,[email protected]:12656,[email protected]:12656,[email protected]:12656,[email protected]:12656,[email protected]:12656,[email protected]:12656,
80fa309afab4a35323018ac70a40a446d3ae9caf@og-testnet-peer.itrocket.net:11656"
sed -i -e "/^\[p2p\]/,/^\[/{s/^[[:space:]]*seeds *=.*/seeds = \"$SEEDS\"/}" \
       -e "/^\[p2p\]/,/^\[/{s/^[[:space:]]*persistent_peers *=.*/persistent_peers = \"$PEERS\"/}" $HOME/.0gchain/config/config.toml

#Update Live Peer
PEERS=$(curl -s -X POST https://rpc-0gchain.josephtran.xyz -H "Content-Type: application/json" -d '{"jsonrpc":"2.0","method":"net_info","params":[],"id":1}' | jq -r '.result.peers[] | select(.connection_status.SendMonitor.Active == true) | "\(.node_info.id)@\(if .node_info.listen_addr | contains("0.0.0.0") then .remote_ip + ":" + (.node_info.listen_addr | sub("tcp://0.0.0.0:"; "")) else .node_info.listen_addr | sub("tcp://"; "") end)"' | tr '\n' ',' | sed 's/,$//' | awk '{print "\"" $0 "\""}')
sed -i "s/^persistent_peers *=.*/persistent_peers = $PEERS/" "$HOME/.0gchain/config/config.toml"
if [ $? -eq 0 ]; then
    echo -e "Configuration file updated successfully with new peers"
else
    echo "Failed to update configuration file."
fi

#confi prune, gas and enable prometheus
sed -i -e "s/^pruning *=.*/pruning = \"custom\"/" $HOME/.0gchain/config/app.toml
sed -i -e "s/^pruning-keep-recent *=.*/pruning-keep-recent = \"100\"/" $HOME/.0gchain/config/app.toml
sed -i -e "s/^pruning-interval *=.*/pruning-interval = \"50\"/" $HOME/.0gchain/config/app.toml
2.5 Create Service File
sudo tee /etc/systemd/system/0gd.service > /dev/null <<EOF
[Unit]
Description=0G Node
After=network.target
[Service]
User=$USER
Type=simple
ExecStart=$(which 0gchaind) start --home $HOME/.0gchain
Restart=on-failure
LimitNOFILE=65535
[Install]
WantedBy=multi-user.target
EOF
Next, reload daemon and enable
sudo systemctl daemon-reload && \
sudo systemctl enable 0gd
Up to this point, we have not yet started the service. Since starting the service to sync from the first block takes time and requires an older compatible binary, we will use a snapshot.
2.6 Download snapshot
For the snapshot, if you need a full version, I recommend choosing the snapshot from Joseph Tran. However, if you want a quicker option, you can use the snapshot from ITRocket.
The benefit of the full snapshot is that it contains complete block information starting from the first block. If you plan to run a 0G Storage Node, I recommend using this version. On the other hand, ITRocket provides a smaller version of the snapshot for faster setup.
Joseph Tran: 3–4 hours, https://josephtran.co/0g/0gchain_snapshot.lz4
IT Rocket: 10–15 mins, https://itrocket.net/services/testnet/og/. You need to go inside the link of ITRocket to get the latest file.
For the command below, replace latest_snapshot_url with the snapshot link provided above. Additionally, replace snapshot_file_name with the name of the file after decompression.
cd $HOME
rm -f <remove_old_snap_shot_file_if_any>
wget --show-progress <latest_snapshot_url>

#decompress
lz4 -dc <snapshot_file_name> | pv | tar -xf - -C $HOME/.0gchain
After this, do not start the node yet. You will have to do the most important step in 2.7
2.7 Replace the priv_validator_key.json with your old node
This step is crucial. If you start running it with the default key automatically generated in step 2.3, you will end up create a new node. However, our goal is to migrate the existing node to this setup. Therefore, let’s copy the old priv_validator_key.json file to replace the automatically generated one.
Important: Do not run two validator nodes with the same key, as this will result in penalties.
Replace path_and_file_from_old_priv_validator_state.json with your old validator key file.
cp ~/<path_and_file_from_old_priv_validator_state.json> ~/.0gchain/data/priv_validator_state.json2.8 Restore your wallet
At this step, simply restore your wallet using the following command. You will be prompted to enter your seed phrase.
0gchaind keys add "wallet" --recover --eth2.9 Start the node
sudo systemctl restart 0gd && sudo systemctl status 0gdAfter starting, your node should be running properly again. Thank you for reading.