How I Run a 0g Storage Node
Actually, I’d already installed the 0g validator, and it was running smoothly. Then it hit me, why not make use of the unused CPU and hard…

Actually, I’d already installed the 0g validator, and it was running smoothly. Then it hit me, why not make use of the unused CPU and hard disk space by installing other 0g components? So, the story begin.
Before I start, I want to give a shoutout to Josep Tran and everyone in the Discord community who helped me achieve this success. I really appreciate it!
1. Install prerequisite
1.1 Install dependencies
sudo apt-get update
sudo apt-get install clang cmake build-essential pkg-config libssl-dev
1.2 Install rustup
curl --proto '=https' --tlsv1.2 -sSf https://sh.rustup.rs | sh1.3 Install Go
# Download the Go installer
wget https://go.dev/dl/go1.23.0.linux-amd64.tar.gz

# Extract the archive
sudo rm -rf /usr/local/go && sudo tar -C /usr/local -xzf go1.23.0.linux-amd64.tar.gz

# Add /usr/local/go/bin to the PATH environment variable by adding the following line to your ~/.profile.
export PATH=$PATH:/usr/local/go/bin
2. Install source code
2.1 Download source code from git
This is the latest version as of Sep 19, 2024.
git clone -b v0.5.1 https://github.com/0glabs/0g-storage-node.git2.2 Build the source code
cd 0g-storage-node

# Build in release mode
cargo build --release
By the way, this step took me about 8 minutes, so be patient.

3. Configuration
3.1 Download snapshot
To speed up the process, I decided to use a snapshot, which was a game-changer. It’s not just about faster syncing, but starting from block 0 can be tricky. And when I tried, it didn’t work out.
In a Discord discussion, someone suggested using another RPC first and then switching back to your own. However, public RPCs tend to be busy and not quite stable. Then, someone recommended using a snapshot first and switching to your own RPC afterward. I gave it a shot, and it worked perfectly. Please note that, my validator node never prunes.
I’m using a snapshot from Josep Tran. It’s been working great. You can check out the full guide here: https://service.josephtran.xyz/testnet/zero-gravity-0g/0g-storage-node/snapshot
To summarized what I did, these are the command
#optional, if you didn't install these library.
sudo apt-get update
sudo apt-get install wget lz4 aria2 pv -y

#download the snapshot
cd $HOME
wget --show-progress https://josephtran.co/0g/storage_0gchain_snapshot.lz4

#extract
lz4 -c -d storage_0gchain_snapshot.lz4 | pv | tar -x -C $HOME/0g-storage-node/run
3.2 Config the node
I prefer using the nano editor and editing the configuration line by line. It’s not the fastest way, and the code below might not be clean. (Most articles will use the sed command.) However, doing it this way helps me understand the configuration — not just copy and paste. This has helped me a lot when issues come up; it lets me fix them faster.
To make life easier, 0g has already provided configuration templates for us. Let’s break down what they are:
- config.toml → This is a standard template, but most of the parameters are empty. It’s quite difficult for me to gather all the necessary information, so I didn’t use this one.
- config-testnet-standard.toml → I didn’t use this one either, as it is intended for HDD setups. If you are using an SSD, you should use the turbo configuration file instead.
- config-testnet-turbo.toml → Since I am using NVMe storage, I chose this template. Only a few parameters need to be added to this config, and most of the default values work for typical cases.
cd $HOME/0g-storage-node/run
nano config-testnet-turbo.toml
Next, apply these configuration. I will try explain each configuration in the comment. By the way, do not copy and paste the whole file. You should find it line by line. (use Ctrl + w for searching in nano)
# enr address. This is our public IP address where we are running storage
# It help peer discovery. Just input you public IP address
network_enr_address = "178.xx.xx.32"


# layer one blockchain rpc endpoint
# This is your rpc.  Since I am running 0g validator on the same machine, I specify 127.0.0.1:8545
# If you didn't run validator node, you can put the public rpc
# blockchain_rpc_endpoint = "https://evmrpc-testnet.0g.ai"
blockchain_rpc_endpoint = "http://127.0.0.1:8545"


# your private key with 64 length
# do not include leading 0x
# do not omit leading 0
# This is your private key, replace xxx with your private key
miner_key = "xxxxxxxxxxx"
I think that’s all for the configuration I made. To be honest, I tried many parameters, but in the end, it came down to just these three parameters (with default values in config-testnet-turbo.toml).
If you tried configuring this but it doesn’t work, I recommend checking out this article. Again, I learned from the best:
3.3 Create the service file
For the service file, it help to run it in the background and ensure it starts automatically after a reboot. Make sure to use the --config parameter pointing to the config-testnet-turbo.toml file that we created in the step 3.2.
sudo tee /etc/systemd/system/zgs.service > /dev/null <<EOF
[Unit]
Description=ZGS Storage Node
After=network.target

[Service]
User=$USER
WorkingDirectory=$HOME/0g-storage-node/run
ExecStart=$HOME/0g-storage-node/target/release/zgs_node --config $HOME/0g-storage-node/run/config-testnet-turbo.toml
Restart=on-failure
RestartSec=10
LimitNOFILE=65535

[Install]
WantedBy=multi-user.target
EOF
Next, register the service file, then load, enable, and start it.
sudo systemctl daemon-reload && \
sudo systemctl enable zgs && \
sudo systemctl start zgs && \
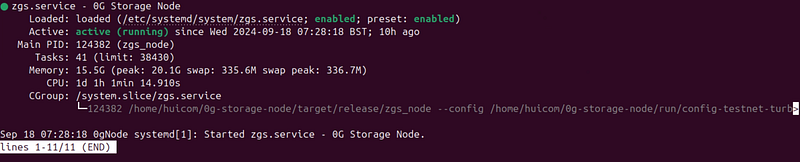
sudo systemctl status zgsYou should get something like this:
To check your storage node is running properly, use this command. It will check storage node every 5 sec.
while true; do
  response=$(curl -s -X POST http://localhost:5678 -H "Content-Type: application/json" -d '{"jsonrpc":"2.0","method":"2gs_getStatus","params":[],"id":1}')
  logSyncHeight=$(echo $response | jq '.result.logSyncHeight')
  connectedPeers=$(echo $response | jq '.result.connectedPeers')
  echo -e "logSyncHeight: \033[32m$logSyncHeight\033[0m, connectedPeers: \033[34m$connectedPeers\033[0m"
  sleep 5
done
You should get result something like this:

Keep an eye on the logSyncHeight value to ensure it keeps increasing. If it gets stuck at some point, you may need to check the configuration.
However, from what I've seen in the Discord, the root cause is usually not related to the configuration but rather the RPC connection. If the public RPC isn't working, I recommend checking out Josep Tran's guide. It’s the best and easiest to follow. With this setup, you'll be able to successfully complete the Intract campaign for both the validator and storage nodes quest.
Thank you for reading, enjoy!!!!