How I run CARV Verifier?
Note: To run CARV Verifier, you will need to purchase license. https://verifier.carv.io/. 1 NODE = 0.4492 WETH. DYOR!!!

Note: To run CARV Verifier, you will need to purchase license. https://verifier.carv.io/. 1 NODE = 0.4492 WETH. DYOR!!!
Hello there! When running a CARV Verifier, you have two options: using the source code or Docker. Personally, I prefer using the source code because it provides more insight into what’s happening behind the scenes and gives you greater control over the process.
However, Docker simplifies things by packaging everything into a container, making it easy to “run and forget.” If you find this too complex, I recommend following the Docker guide or even delegating to an existing verifier. Currently, they charge less than 0.5%, and you won’t need to worry about maintenance or electricity costs.
But if you’re a node runner or interested in getting started the verifier journey, this is a good option — it’s user-friendly and not too complicated.
Wallet Planning

To keep this secure, I plan to store my license NFT in a cold wallet and delegate it to a hot wallet. The hot wallet, which will run the verifier node, will be generated using a keystore (details below). For claiming rewards, I’ll specify the cold wallet address as the reward claimer. This way, the license and rewards remain safe in the cold wallet, minimizing exposure to risk, while the hot wallet takes care of the node’s day-to-day operations. It’s a balance between security and functionality that should work well.
Installation guide
1. Install Make & Go
I tried using the latest Go version 1.23.2, but it gave an error. So, I switched to an earlier version, 1.22.8, which worked.
# Install make and git
sudo apt update
sudo apt install make git -y

# Download Go
wget https://go.dev/dl/go1.22.8.linux-amd64.tar.gz

# Extract Go tar file to /usr/local
sudo tar -C /usr/local -xzf go1.22.8.linux-amd64.tar.gz

# Set environment variable for Go (temporary)
export PATH=$PATH:/usr/local/go/bin

# (Optional) Set environment variable permanently
echo "export PATH=$PATH:/usr/local/go/bin" >> ~/.profile
source ~/.profile

# Check Go version
go version
You should see something like this:

2. Clone & Build CARV Verifier Source Code
Now, clone the CARV verifier repository and build the source code
git clone https://github.com/carv-protocol/verifier.git
cd verifier
make build
3. Generate Keystore
#create folder for your keystore
cd $HOME
mkdir CARVKeystore

#navigate to binanry folder
cd $HOME/verifier/bin
./verifier -generate-keystore -keystore-path $HOME/CARVKeystore
You will be asked to provide a password — make sure not to lose it. Once entered, a wallet will be generated in the keystore, and you will be given the address. You will use this address for delegation.
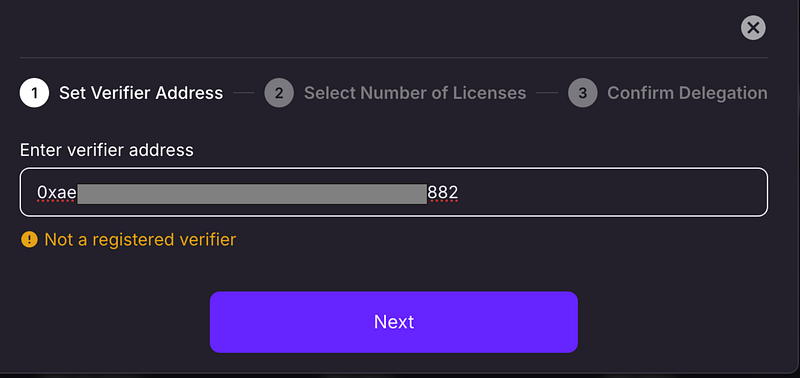
(for me: 0xae…………882)

Your key information will be stored in a file within the CARVKeystore folder. We will reference this file again in step 5. It will start with UTC-2024-10-12T04-44-xxxxxxx.
4. Delegate your license
Once you have your keystore address, delegate your node license from your cold wallet to this address via the Carv Protocol Explorer.
url: https://explorer.carv.io/verifiers

5. Make it Up and Run
If it’s a one-time activity, we can simply execute it.
#This is just a sample, please do not run this command. It will result in an error."
./verifier -keystore-path <Path to keystore file> -keystore-password <keystore password> -reward-address <Your Reward Address> -commission-rate <Your Commission Rate>
However, if your session ends or the system crashes, you will need to manually rerun this command. To automate this, we will create a service file that ensures the command runs every time the system reboots. Essentially, this service file is a set of instructions telling the OS which command to run, with what parameters, under which user, how often, etc.
One of the parameters the verifier uses is a password, but I prefer not to include the password directly in the service file for security reasons. Instead, I will create an environment file that only my user can access, and the service file will reference that. While this isn’t the most secure method, there are more secure approaches, but they would be more complex for now.
#create enviorment file with password
sudo nano /etc/carv-verifier.env
Inside the file, specify the key & value
#Key value
KEYSTORE_PASSWORD="your_password"
Then, quit and save (CTRL+X, Y).
Next, change the ownership (optional — skip this if you’re using root. In this case, ‘huicom’ is my current username).
#change ownership
sudo chown huicom:huicom /etc/carv-verifier.env
sudo chmod 600 /etc/carv-verifier.env
Create a service file. I am using the nano text editor
sudo nano /etc/systemd/system/carv.serviceThen, copy and paste these code
[Unit]
Description=Carv Protocol Verifier Node
After=network.target

[Service]
EnvironmentFile=/etc/carv-verifier.env
ExecStart=/home/huicom/verifier/bin/verifier -keystore-path <KeyStore_Path_File> -keystore-password $KEYSTORE_PASSWORD -reward-address <Cold_wallet_address> -commission-rate <Commission_rate>
Restart=on-failure
User=huicom
WorkingDirectory=/home/huicom/verifier/bin/verifier
Environment="PATH=/usr/local/go/bin:/usr/bin"

[Install]
WantedBy=multi-user.target
Replace:
- Replace
"huicom"with your username everywhere (e.g., root). <KeyStore_Path_File> = /home/root/CARVKeystore/UTC-2024-10-xxxxxx(This is the file created in step 3)<Cold_wallet_address>= replace with your cold wallet address<Commission_rate> = 5(This is a value between 0 and 10, where 5 represents 5%. Do not include '%' in the command.)
Then, save and exit nano (CTRL+X, Y). Next, it's time to execute.
sudo systemctl daemon-reload
sudo systemctl start carv
sudo systemctl enable carv
sudo systemctl status carv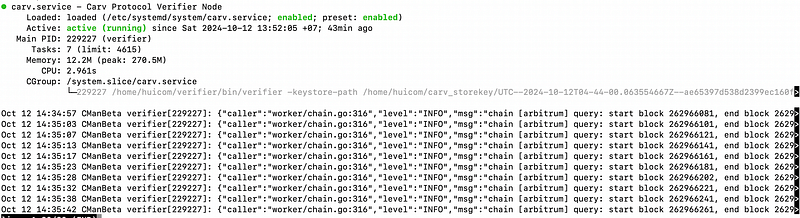
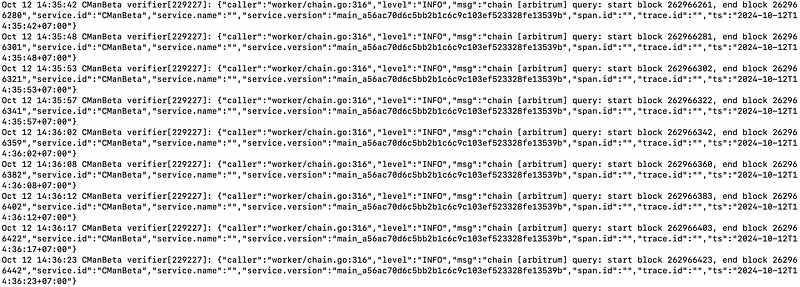
To see the log file:
sudo journalctl -u carv -fResult:
Next, go back to https://explorer.carv.io/verifiers, and you should see that your license has been delegated and the node is marked as “Active.”

Congratulation….You node is running. That’s all for today. Thank you