How I Run POP Miner in Hemi Testnet?
When I choose projects for airdrop farming, I have a simple rule: it should have raised over $20M. This project hasn’t quite hit that…

When I choose projects for airdrop farming, I have a simple rule: it should have raised over $20M. This project hasn’t quite hit that number yet, but it got me thinking — there’s huge potential for growth in the upcoming Series A or B rounds. Plus, I’ve noticed that projects backed by Binance Labs often offer more airdrops than those without their support!

First things first, head over to their website and connect your wallet. Don’t forget to enter the referral code and connect with X as well. By the way, I’d really appreciate it if you use my referral code — it’d be a kind favor! 😊
URL: https://points.absinthe.network/hemi/start
Ref: 23ccef7d

Once you’re signed in, just head to the quests section and complete the social quests.

The quests are actually quite easy: faucet, bridge, swap, mint, create transactions. But when I checked out their dev channel and docs, I found something interesting — there’s a POP Miner CLI.
Normally, being a miner requires special hardware like ASICs on the mainnet, which isn’t for me since it involves a huge investment and feels like a red ocean. But for a testnet like this, I’m definitely up for giving it a try. Let’ s start.
1. Setup & Installation
There are two binary versions: windows and linux. In Windows, it’s usually straightforward — just download, double-click, set it up, and let it run. However, in the Linux world, things are a bit more complicated, but it’s more resilient and easier to maintain in the long run. We will focus on Linux.
1.1 Download Binary — POP Miner CLI
#download
wget https://github.com/hemilabs/heminetwork/releases/download/v0.4.3/heminetwork_v0.4.3_linux_amd64.tar.gz

#extract
tar xvf heminetwork_v0.2.8_linux_amd64.tar.gz

#navigate
cd heminetwork_v0.2.8_linux_amd64
1.2 Generate key
You’ll need a private key as part of the configuration to get this running. Fortunately, the binary provides commands to handle this. Here’s how:
#inside binary dirctory,execute and it will create json at home directory
./keygen -secp256k1 -json -net="testnet" > ~/popm-address.json

#open json
cat ~/popm-address.json
You should get something like this:
{
"ethereum_address": "0x51xxxxxxxxxxxxxxxxxxxxxxxxxxA62",
"network": "testnet",
"private_key": "0aecxxxxxxxxxxxxxxxxxxxxxxxxxxxxxxxxxxxxxxxxxxxxxxxx38a",
"public_key": "034a65xxxxxxxxxxxxxxxxxxxxxxxxxxxxxxxxxxxf88e",
"pubkey_hash": "mxqxxxxxxxxxxxxxxxxxxxxxxxxqoMj"
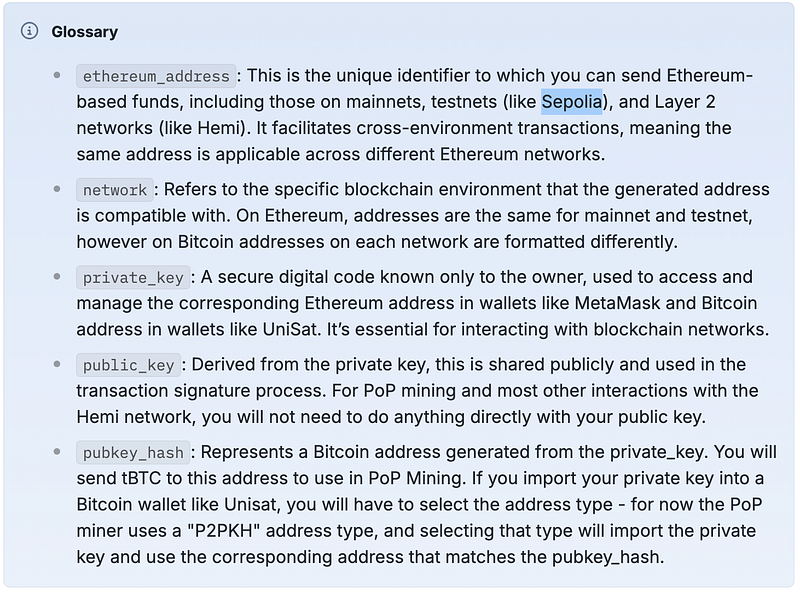
}Additionally, their official documentation includes a well define business glossary that explains everything in detail. You can check it out below:
1.3 Get tBtc faucet in discord
Now, going back to the key we created, there’s a pubkey_hash for the BTC address. You’ll need some tBTC to cover gas fees—at least 0.002 tBTC.
Head over to grab the faucet from their Discord → faucet channel, and you’ll be ready to go!
Note: Make sure to use the tbtc-faucet command in Discord. The regular faucet command is for ETH, but we need tBTC for this.


2. Create environment variable and service file
Actually, the official documentation is much simpler than this. You just execute the binary and check the output in the command line. However, I prefer doing it this way since it’s easier to maintain in the long run.
2.1 Create env file
sudo nano /etc/popmd_envInside nano, set variable:
#repalce with your private key
export POPM_BTC_PRIVKEY=<private_key>
export POPM_STATIC_FEE=<fee_per_vB_integer>
export POPM_BFG_URL=wss://testnet.rpc.hemi.network/v1/ws/public
Remember to replace the <private_key> with your private key (step 1.2). Also, set the POPM_STATIC_FEE to 50, as recommended in the official guide.
2.2 Create Service File
Before copying and pasting, make sure to update the path to reflect your username. You need to modify the paths below to correspond to your specific username.
Change from:
WorkingDirectory=/home/<user>/heminetwork_v0.4.3_linux_amd64
ExecStart=/home/<user>/heminetwork_v0.4.3_linux_amd64/popmd
to
WorkingDirectory=/home/pokoblue/heminetwork_v0.4.3_linux_amd64
ExecStart=/home/pokoblue/heminetwork_v0.4.3_linux_amd64/popmd
Note: Replace “pokoblue” with your actual username.
sudo tee /etc/systemd/system/popmd.service > /dev/null << EOF
[Unit]
Description=PoPM Service
After=network.target

[Service]
EnvironmentFile=/etc/popmd_env
WorkingDirectory=/home/<user>/heminetwork_v0.4.3_linux_amd64
ExecStart=/home/<user>/heminetwork_v0.4.3_linux_amd64/popmd
Restart=always
RestartSec=5

[Install]
WantedBy=multi-user.target
EOF
Note: replace <user> with your username in both WorkingDirectory and ExecStart
2.3 Next, load, run and check status
Once the service file is ready, we’ll register and run it. After that, we can check the result to make sure it’s running smoothly.
# Reload systemd to recognize the new service
sudo systemctl daemon-reload

# Enable the service to start on boot
sudo systemctl enable popmd.service

# Start the service
sudo systemctl start popmd.service

# Check the status of the service
sudo systemctl status popmd.service
You shoud get something like this:

If you want to view the log file, use this command:
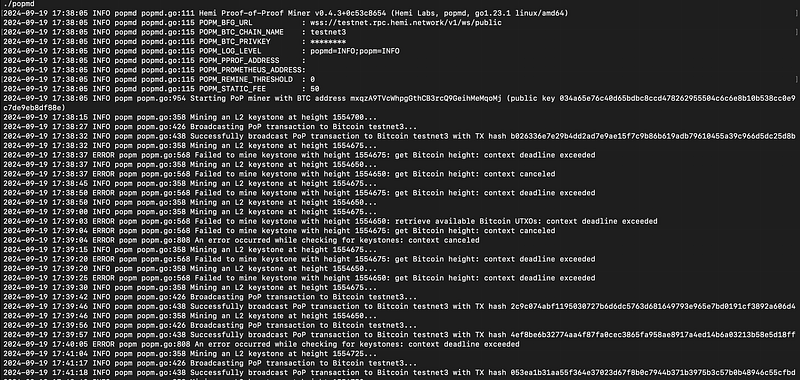
sudo journalctl -u popmd.service -fThis will display the real-time logs for the service. You should get something like this.
3. Check it On-Chain
To check the on-chain transaction, search for your account at the following URL: https://mempool.space
You should get something like this.

Observe that your faucet balance will gradually decrease, as it’s being used for PoP BTC CLI. If that’s happening, you’re on the right track — it’s pretty cool! Get ready for the next quest from the team. Enjoy
Thank yo for reading.