How I run Story Protocol Node (EP1) — Node Installation
Update: The developers have provided some updated documentation and code. I have tested it, and it works.
Please visit this link: EP3
https://medium.com/@huicomm/hey-fam-so-i-just-successfully-updated-the-story-protocol-node-and-let-me-tell-you-it-was-quite-fcb18c710ded
Skip all the guide below. I will leave it as reference only.
Disclaimer: This is not financial advice. Please do your own research before making any decisions. There have been no promises or expectations set by the team at this time.
If you ask anyone in Story Protocol ‘s Discord, they’ll likely tell you that the node is not yet available — but it will be soon. However, through my own research, I discovered that the developer who committed the source code to the official repository also included the source code for the node. Curious, I decided to try it out, and to my surprise, it worked.
But simply getting the node to run wasn’t enough for me to dive in completely. There’s much more to consider before starting to run this node. Interestingly, a headline I came across on Twitter caught my attention and adds another layer to this story.

If you ask me about my 80:20 rule for running nodes, it’s pretty straightforward: run the node of projects that have significant fundraising and where you can start early. That’s all for the introduction — let’s dive in and get this node running.
For the available source code, you have two primary options for running it: via command line interface (CLI) or using Docker.
While Docker might be the better choice if you’re running on a VPS, I personally prefer the CLI because it gives me more control over the network setup. So, this article will focus on setting up and running the node using the CLI.
1. Check out the running script from git
The first step in setting up the node is to check out the running script from GitHub. You can do this by cloning the repository using the following command:
git clone https://github.com/storyprotocol/node-utils.gitThis command will download all the necessary files from the node-utils repository, which includes scripts and configurations required to run the node.
Optional: Install screen. We will need it.
Before proceeding, it’s a good idea to install screen as we will need it to run multiple components simultaneously. Screen allows you to manage multiple terminal sessions and keep processes running even if you disconnect from the terminal. This will be especially useful in the next steps.
To install screen, use the following commands:
sudo apt update
sudo apt install screen
2. Run 2 components
After reviewing the Docker configuration in the repository, I noticed that it installs two components. Based on this observation, I guessed that both components would need to be run independently.
The two components you need to run are:
- Geth: This is the Go Ethereum client, which serves as the backbone of the network.
- Iliad: This component handles specific tasks related to Story Protocol.
We’ll start by running geth and then move on to iliad.
2.1 Run “geth” — choose option 1 (must run this first)
The first component you need to run is geth. Follow the steps below to get it up and running:
- Create a screen session:
Start by creating a new screen session for geth:
screen -S geth2. Execute the Geth client:
Navigate to the directory where the run_commands.sh script is located and make it executable:
cd node-utils/story-node-cli/linux
chmod +x run_commands.sh
sudo bash run_commands.sh
3. Select Option 1:
When prompted, choose the geth client by entering 1:
Please choose a client to start:
1) geth
2) iliad
Enter your choice [1 or 2]:  1
After running for a few minutes, the process will pause. At this point, you can detach the screen session by pressing Ctrl + A, D. This will allow you to create a new screen session for the next step.
2.2 Execute Iliad — Choose Option 2 (Run After Geth Is Up and Running)
Once geth is up and running, the next step is to execute the iliad component. Follow these steps:
- Create a screen session:
Start by creating a new screen session for iliad:
#create sceen session
screen -S iliad
2. Execute the Iliad client:
Navigate to the same directory and run the run_commands.sh script again:
cd node-utils/story-node-cli/linux
sudo bash run_commands.sh
3. Select Option 2:
When prompted, choose the iliad client by entering 2:
Please choose a client to start:
1) geth
2) iliad
Enter your choice [1 or 2]:  2
4. Enter the Moniker:
After selecting option 2, you will be prompted to specify a moniker name. Enter your desired moniker:
Enter the moniker: ABCNameAfter completing these steps, you can return to the first screen session (geth). You should see that the node is syncing.
If you’re ready to continue with the SDK installation, you can follow along in my StoryNode EP2: How to Run Story Protocol Node (EP2) — SDK & Wallet.
Note on Creating a Validator Node
As you might have noticed, this guide does not yet include steps to create a validator node. In my experience with setting up nodes like the 0g node or Warden node, the process typically involves creating wallet, obtaining tokens from a faucet and configuring the validator. However, I currently do not have access to this information for the Story Protocol node setup.
Note for Running This Node Alongside 0g and Warden Nodes
If you’re planning to run this node on the same VPS as your 0g or Warden nodes, be aware of potential port conflicts. Based on my checks, this node listens on ports 8545 and 26657. Although you might not encounter immediate errors because the node currently listens via IPv6, there's a high potential for these ports to be used later by the development team. This could cause conflicts if the same ports are in use by other nodes on the same server.
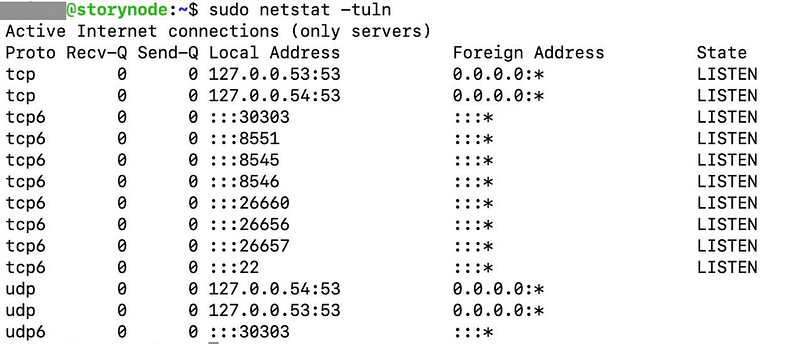
I recommend monitoring these ports and being prepared to adjust your configurations if needed.
Once the necessary details become available from the team, I will update this document to include the steps required to set up a validator node.
That’s all for today. At the time of this writing, it’s still very early in the process. If I’m not mistaken, when I started running this node, there were only 2 peers connected. I will keep this document updated from time to time as the team releases updates.
Thank you, everyone, for reading!