I finally made my Xiaomi fan follow my bike speed (and what I broke along the way)

If we were having coffee, this is how I’d tell you the story.
I’ve been trying to make my working room turn into a tiny pain cave: hop on the trainer, turn on the projector, start a Rouvy ride, and have the Xiaomi standing fan “just know” how hard I’m working. More speed = more wind. Sounds simple. It wasn’t. 😅
My trainer is a device that replaces the bike’s rear wheel. You mount the bike onto the trainer, then you can spin and change gears as usual. When the Rouvy app shows a climb on the projector, the trainer automatically increases the resistance, so it feels like you’re going uphill.
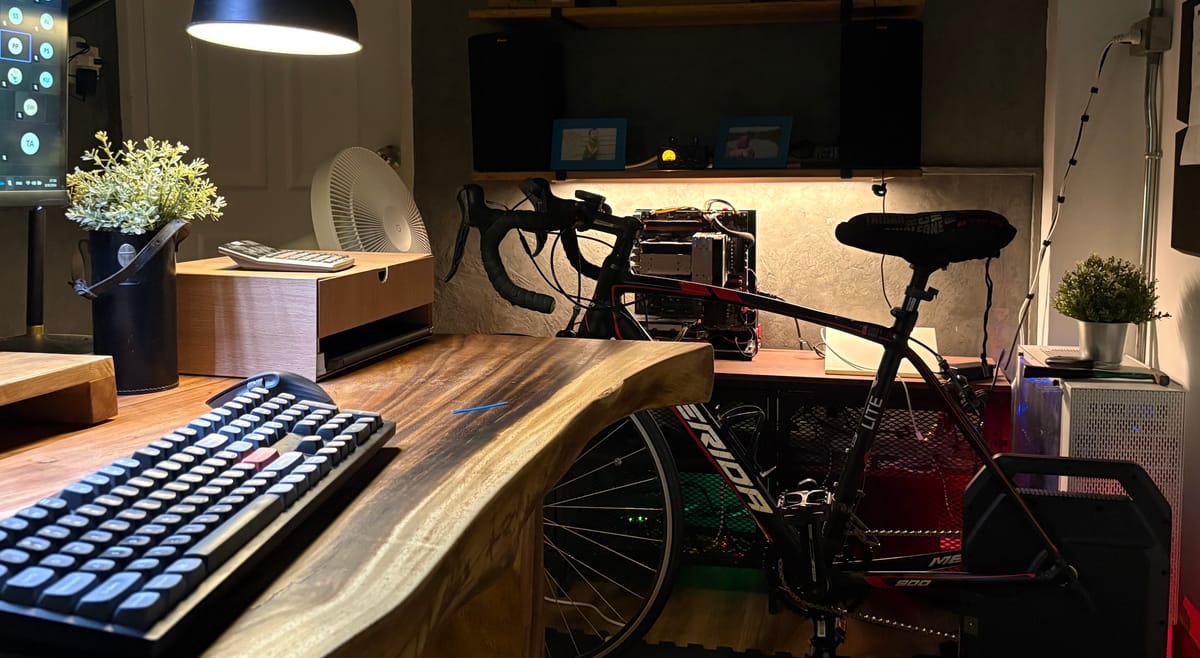
My set up
- Bike: Any road or mountain bike will work. Mine is very old and hadn’t been used for over 10 years. I just changed the chain and cogs, and now everything works well.
- Trainer: ThinkRider XX Pro ($350)
- App: Rouvy on tablet/phone (my actual workout app 20 Euro/month)
- Projector: Wanbo Vali 1 (just normal 1080p projector under $200)
- Home brain: Home Assistant (HAOS on a Raspberry Pi)
- Fan: Xiaomi Fan Pro 2 ($50+/-)
- Network zoo: a few Ubuntu/KVM VMs on my “linux” box for dashboards and experiments
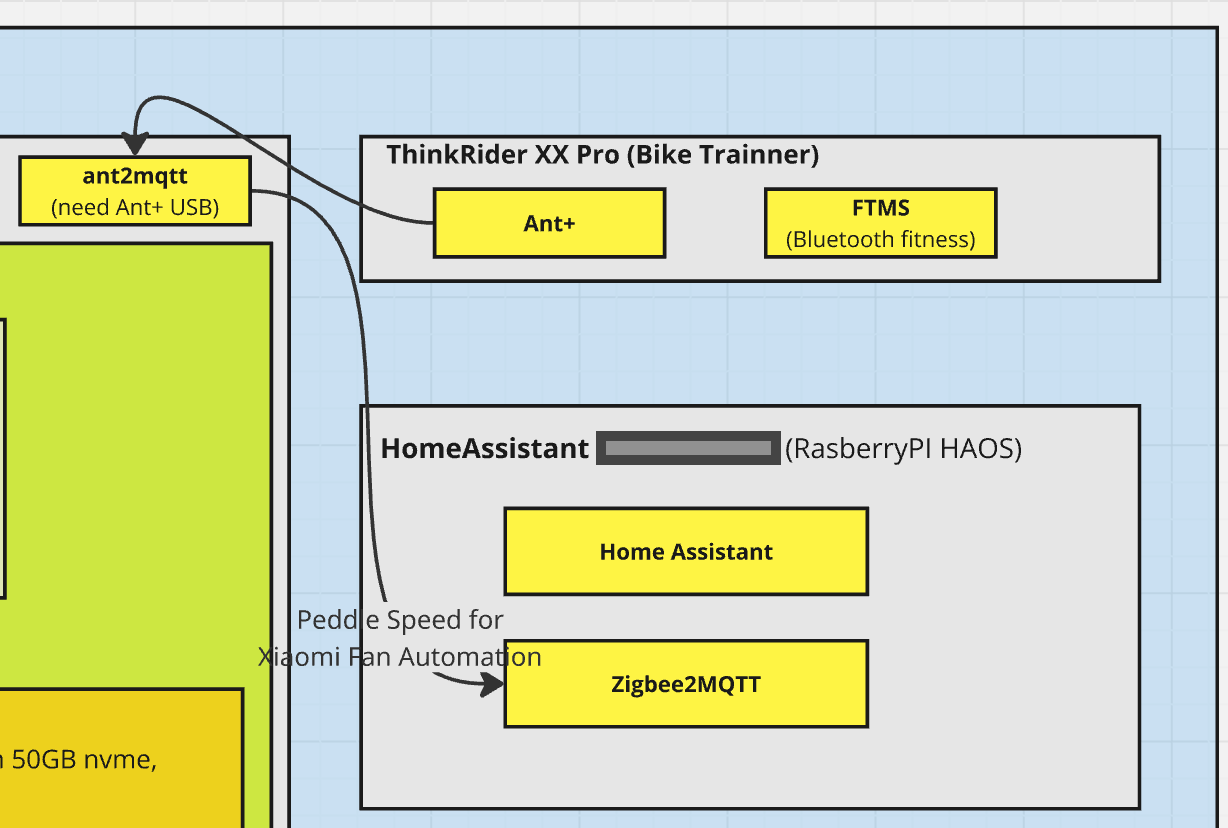
There’s a little diagram in my notes that looks like a subway map—trainer on one line, HA on another, everything looping through the house Wi-Fi, Ant+ USB and a Zigbee bridge. That drawing became the emotional support animal for this project.
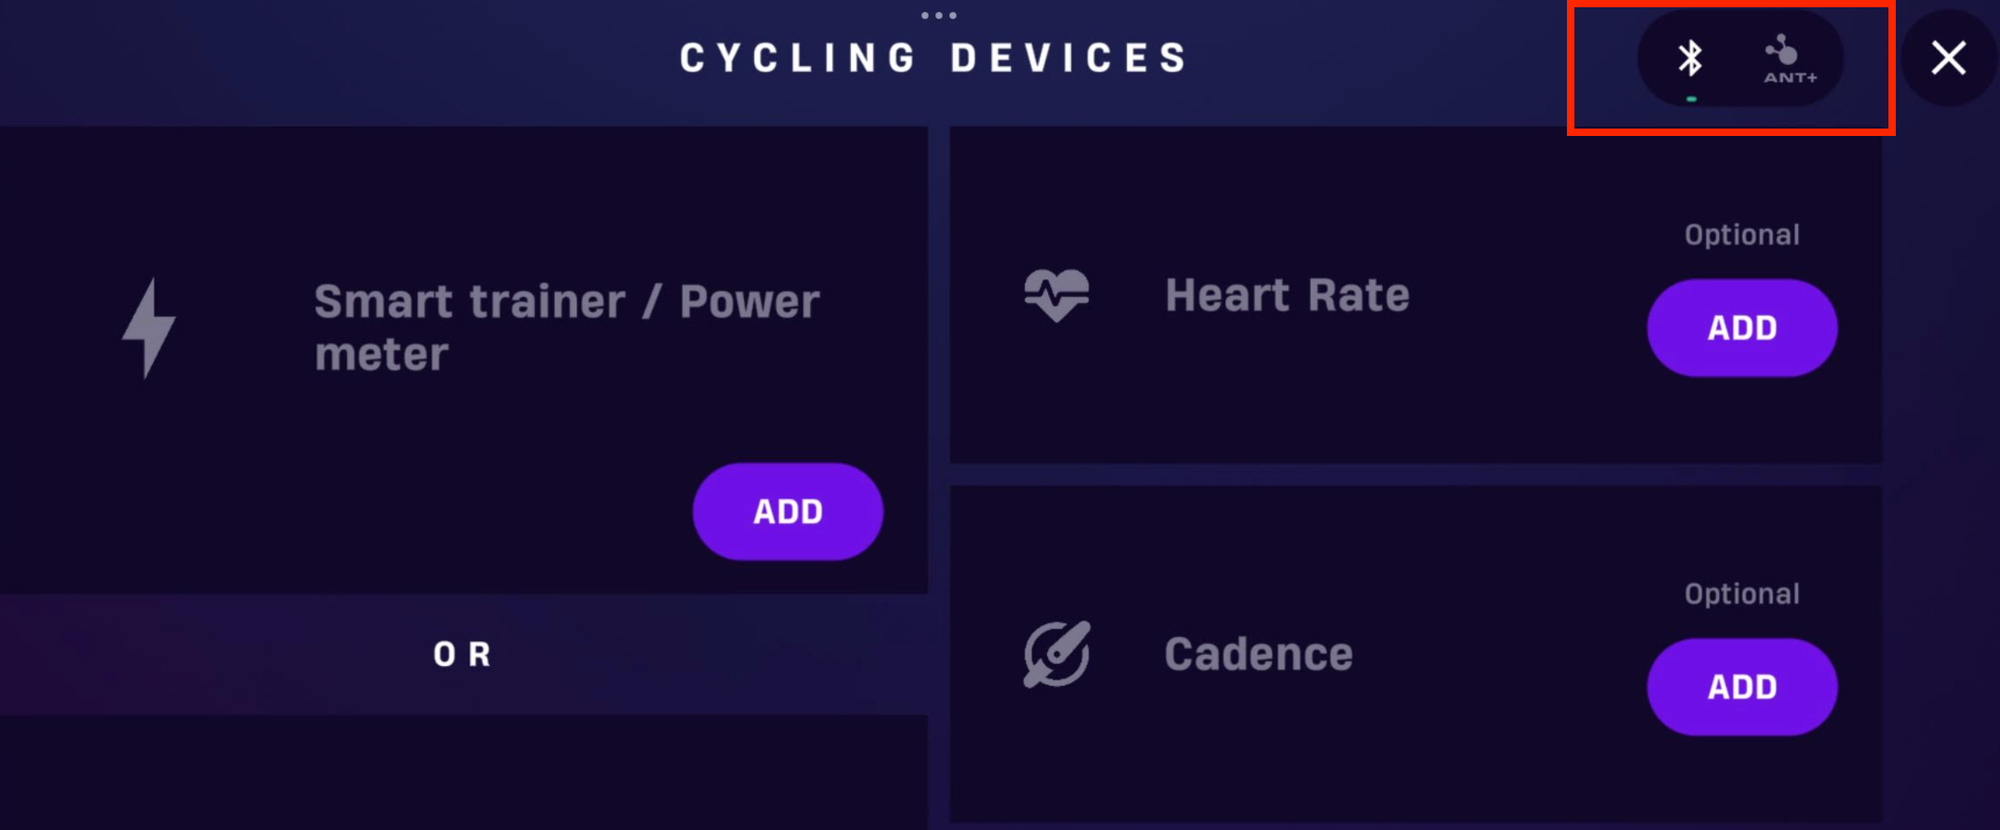
Before we go deeper, just let you know there are two communication protocols in the fitness Bluetooth world: FTMS and ANT+. I just don't know exactly how they differ and why we need 2 protocols working for exactly the same purpose. I started working with ChatGPT to get the speed from the trainer via FTMS, but it doesn't seem to work in the end. Here is the story.
The wrong turn: FTMS everywhere
My first idea was "official": connect the trainer to Home Assistant (HA) via FTMS Add-on (Bluetooth Fitness). HA could then read speed/power and drive the fan. I still remember how I felt the first time I turned the pedals and the fan started spinning. Moreover, the fan speed level adjusted when the speed changed—the harder I spun, the stronger the wind. This is what I expected from simulating virtual biking. Technically, it worked… until I opened Rouvy.
Surprise: Bluetooth FTMS is a jealous protocol. Once HA locked onto the trainer, Rouvy couldn’t connect at the same time. I spent too many hours reinstalling, rescanning, yelling at the air, and toggling auto-FTP settings like a person bargaining with fate. It wasn’t a bug. It’s just how FTMS behaves with single-client connections.
Lesson: if you actually ride with Rouvy (or Zwift, TrainerRoad, etc.), don’t let Home Assistant hog FTMS. Let the workout app own the trainer.
The pivot: let Rouvy have FTMS, give HA the data another way
So I flipped the logic:
- Rouvy keeps the Bluetooth FTMS connection to the trainer (happy athlete).
- Home Assistant gets speed data from Ant+, then uses that to control the fan (happy automation).
- ANT+ → MQTT bridge (e.g.,
ant2mqtt): trainer broadcasts speed over ANT+, HA listens via MQTT.
MQTT is like a message delivery system for smart devices—think of it as a postman carrying data between your gadgets instead of letters. Devices "publish" messages to topics (like putting mail in mailboxes) while other devices "subscribe" to those topics (like checking specific mailboxes). I learned MQTT through my Zigbee setup: my Xiaomi motion sensors speak Zigbee, but Home Assistant needs MQTT messages, so Zigbee2MQTT acts as the translator. Basically, MQTT is the invisible messenger system that makes my entire smart home work together—and now it's helping with my fitness trainer too.
I tested a couple of paths. The “clean” architecture I landed on is:
- Rouvy talks BT FTMS directly to the trainer.
- HA reads speed (not control) via a Ant+
- HA maps speed → fan percentage and sends commands to the Xiaomi Fan Pro 2 via Ant2MQTT. I chose this fan model because I can adjust the speed from 0 to 100% from HA.
No more tug-of-war. But the part below is quite technical. I'm honestly telling you that I didn't make everything myself. ChatGPT helped me with 80% of this part, but you still need some skill to understand what it's doing. I mean you should ask and check along the way for anything that you don't understand. Otherwise, it may become never-ending prompts and you might give up in the long term.
Why we put ant2mqtt on a Linux box
- ChatGPT said I can also put the ANT+ USB and ant2mqtt logic in the HA box, but it may become more difficult since HA is like a smaller version of Linux. I might need to install and tune up many things before I'm ready to start the ant2mqtt logic. So, I did it in linux box.
- ANT+ is broadcast: One trainer → many listeners. A USB ANT+ stick on a small Linux box can “sniff” speed/power without blocking Rouvy.
- Always-on + close to trainer: The Linux box sits near the bike, runs 24/7 as a systemd service, and just publishes speed to MQTT. HA subscribes and drives the Xiaomi fan. Clean separation.
What we used
- Node.js libraries
ant-plus— reads ANT+ (via your USB ANT+ dongle)mqtt— publishes readings to your broker- (optional)
dotenv— manage env vars
- Hardware: Any Garmin/ANT+ USB stick (Garmin Stick 2/3 or equivalent). I got it under $10 from my local online shopping platform (Shopee)
Install:
#install node

sudo apt update && sudo apt install -y nodejs npm
mkdir ant2mqtt && cd ant2mqtt
npm init -y
npm i ant-plus mqtt dotenv
install in linux
The tiny script (speed → MQTT, with gentle smoothing)
Create index.js:
// ENV: MQTT_URL, MQTT_TOPIC, EMA_ALPHA, ANT_STICK (2 or 3)
require('dotenv').config();
const mqtt = require('mqtt');
const Ant = require('ant-plus');

const MQTT_URL   = process.env.MQTT_URL   || 'mqtt://127.0.0.1:1883';
const MQTT_TOPIC = process.env.MQTT_TOPIC || 'sensors/trainer/speed_kmh';
const EMA_ALPHA  = process.env.EMA_ALPHA  ? Number(process.env.EMA_ALPHA) : 0.35;
const ANT_STICK  = Number(process.env.ANT_STICK || 2); // 2 = GarminStick2, 3 = GarminStick3

const client = mqtt.connect(MQTT_URL);

// Choose your stick
const stick = ANT_STICK === 3 ? new Ant.GarminStick3() : new Ant.GarminStick2();

// Option A: Fitness Equipment profile (many smart trainers)
const fe = new Ant.FitnessEquipmentSensor(stick);

// Option B (fallback): Bicycle Speed/Cadence sensor (wheel sensor or some trainers)
// const sc = new Ant.BicycleSpeedCadenceSensor(stick);

let ema = 0;
function smooth(v) {
  ema = EMA_ALPHA * v + (1 - EMA_ALPHA) * ema;
  return ema;
}

client.on('connect', () => console.log('[MQTT] connected', MQTT_URL));

stick.on('startup', function () {
  console.log('[ANT] stick up, scanning...');
  // FE profile usually gives speed in m/s; we convert to km/h
  fe.on('fitnessData', (data) => {
    const mps = Number(data.instantaneousSpeed || 0);   // m/s if provided by your trainer
    const kmh = mps * 3.6;
    const v = smooth(kmh);
    client.publish(MQTT_TOPIC, JSON.stringify({ speed_kmh: Number(v.toFixed(2)), ts: Date.now() }), { retain: true });
    process.stdout.write(`\rSpeed: ${v.toFixed(2)} km/h   `);
  });
  fe.scan(); // wildcard scan for any FE device

  // If using Speed/Cadence instead, comment the FE block above and use:
  // sc.on('speedData', (data) => {
  //   // ant-plus exposes calculatedSpeed in m/s when wheel circumference is known
  //   const mps = Number(data.CalculatedSpeed || data.calculatedSpeed || 0);
  //   const kmh = mps * 3.6;
  //   const v = smooth(kmh);
  //   client.publish(MQTT_TOPIC, JSON.stringify({ speed_kmh: Number(v.toFixed(2)), ts: Date.now() }), { retain: true });
  //   process.stdout.write(`\rSpeed: ${v.toFixed(2)} km/h   `);
  // });
  // sc.setWheelCircumference(2.096); // meters (700x25c example)
  // sc.scan();
});

if (!stick.open()) {
  console.error('[ANT] failed to open stick — check permissions/usb!');
}
.env (example):
#replace with your Home Assistant ip address, default mqtt port is 1883
MQTT_URL=mqtt://192.168.1.xx:1883

#my trainer broadcasint exactly this name "speed_kmh". you might need to check the name broadcasted from your trainner.
MQTT_TOPIC=sensors/trainer/speed_kmh

#how frequent it will trigger, 0.5 is twice a second
EMA_ALPHA=0.5

ANT_STICK=2
Run:
node index.js
You’ll see Speed: 23.4 km/h streaming, and MQTT will get JSON like:
{"speed_kmh":23.42,"ts":1726890000000}
The first version that actually felt good
Once speed started flowing into Home Assistant as a sensor (mine shows up like sensor.think_xx01_1013996_speed_km_h), the rest was fun:
- I set the fan to respond within a speed window of 5–25 km/h. I’m still a biking noob—my max is about 35 km/h, but most of the time I’m cruising between 5 and 25. So I capped detection at 25 km/h. If I hit 25 or higher, the fan kicks in at 95%.
- Mapped that to fan 5–95% (100% was a leaf blower 💨).
- Added a 3-minute grace so the fan ramps down slowly after I stop. Nice cool-down, no “ice bath” shock.
- Clamped minimum fan speed so gentle spins still feel like air is moving.
The “friend version” of the logic
“When bike speed is under 3 km/h for 3 minutes, start cooling down the fan.
When speed is between 5 and 25 km/h, follow it.
Never blast more than 95% fan power.
Never drop below 5% if I’m still moving.
Change smoothly, not every millisecond.”
That’s it. When you think about it like that, all the YAML and MQTT drama becomes calm.
If you want to copy the idea (short YAML sketch)
Go to HA – > Setting – > Automation --> Create automation. then, toggle the YAML and paste this:
alias: Fan ↔ Bike Speed (follow + cooldown)
mode: restart
trigger:
  - platform: state
    entity_id: sensor.think_xx01_1013996_speed_km_h
    for: "00:00:02"   # tiny debounce
variables:
  v_speed: "{{ states('sensor.think_xx01_1013996_speed_km_h')|float(0) }}"
  v_pct: >-
    {% set s = v_speed %}
    {% if s < 5 %} 5
    {% elif s > 25 %} 95
    {% else %}
      {# smooth-ish curve: emphasize mid-range #}
      {{ (5 + ( (s-5) / (25-5) )**0.8 * (95-5) ) | round(0) }}
    {% endif %}
action:
  - choose:
      - conditions: "{{ v_speed < 3 }}"
        sequence:
          - delay: "00:03:00"          # cooldown window
          - condition: template
            value_template: "{{ states('sensor.think_xx01_1013996_speed_km_h')|float(0) < 3 }}"
          - service: fan.turn_off
            target: { entity_id: fan.dmaker_p18_d781_fan }
    default:
      - service: fan.turn_on
        target: { entity_id: fan.dmaker_p18_d781_fan }
      - service: fan.set_percentage
        target: { entity_id: fan.dmaker_p18_d781_fan }
        data:
          percentage: "{{ v_pct }}"
TBH, I can’t explain every single line of code, but I understand what it’s doing—at least 80% of it.
What I’d do differently (so you don’t waste time)
- Decide early who owns the trainer. If a training app needs FTMS, don’t let HA take it.
- Get data via broadcast (ANT+/BLE) or a mirror (MQTT), not via FTMS which is control protocols.
- Start simple: linear speed→fan mapping, then shape the curve once it “feels” right.
- Debounce everything. Fans don’t need sub-second updates; your logs (and sanity) will thank you.
- Cap the top end. 95% on the Xiaomi Fan Pro 2 is plenty; above that feels noisy without more cooling.
That bring me the end of this story. It’s a tiny quality-of-life thing that makes every ride feel more “studio”.
Once I treated FTMS like a single-seat cockpit for Rouvy and moved Home Assistant to the observer lane, everything clicked. Now the Xiaomi fan doesn’t feel like an appliance—it feels like part of the ride.
If you’re building something similar and you’re stuck on the “why won’t Rouvy connect” loop… it’s probably FTMS being possessive. Give it to Rouvy, feed HA with ANT+/MQTT or a broadcast sensor, and enjoy the wind. Thank you for reading.