Jaine LP on my DIY e-ink screen

It started at 6:30 AM, right after my automated cat door project failed.
I wanted to control the cat door by putting an NFC tag on my cat’s collar, then unlocking the door when the cat came near. Sounds simple, and the build went super smoothly. Everything worked as intended—except for one big problem: the NFC range was way too short. The tag basically had to be 1–2 cm from the reader antenna, and I can’t exactly teach my cat to line it up perfectly every time.
ChatGPT told me that’s just a limitation of that setup, and the “fix” was to upgrade to a much more expensive NFC reader—honestly, more expensive than just buying a commercial NFC cat door.
Then, I had an idea: reuse the parts to build something actually useful—an e-ink display that shows my Jaine LP position.
This whole thing started from a very real pain: I had to check each wallet one by one to see how my Jaine position was performing. It was manageable with two wallets, but once I expanded the LP across multiple wallets, it turned into pure laziness fuel. I’d end up opening five browser tabs and doing mental math every few hours.
So I decided to use my 7-inch e-ink screen to show everything at a glance.
The funny part is, the e-ink screen itself was from another failed project five years ago—back when there was barely any good info on how to implement it, and ChatGPT didn’t exist yet.
Before we begin, I set some ground rules.
Design Principle
- Setup and forget—like a picture frame.
- It has to be low power. A picture frame should be able to hang anywhere, even if there’s no power outlet nearby (and honestly, the cable looks ugly anyway).
- And because it’s a picture frame by design, it should only display images. All the heavy processing should happen somewhere else—not inside the frame.
Based on those principles, I came up with a solution that checks all the boxes:
- I chose an ESP32-S because it has a low-power footprint. It can sleep for 10–15 minutes, wake up, refresh the screen, then go back to sleep. When it’s sleeping, the power usage is basically close to zero.
- For the display, a 7-inch e-ink screen is a perfect fit because it only consumes power when changing the image. The last time I updated this e-ink display was four years ago, and the picture is still showing today.
- For power, I use one rechargeable 18650 battery. It’s about 2× the size of an AA battery, but it’s enough for both the e-ink (3.3V) and the ESP32. With this setup, the battery can run the ESP and e-ink for around 7–10 days.
- On-chain queries and image generation happen on my self-hosted Ubuntu server. The stack is Python, FastAPI, and n8n for scheduling. Doing all the on-chain logic inside the ESP32 would be painful—and more importantly, the ESP32 doesn’t have enough RAM and processing power for that. Even rendering the image alone is already pushing it.
That’s basically the setup.
If this was 2020—before ChatGPT—just getting to this point would’ve taken a huge amount of effort in setup and coding. But this time, I used ChatGPT together with Antigravity, and honestly, they worked really well. I just pasted the design principles into ChatGPT and told it to design the solution for me. I also asked it to break the project into two milestones:
- Set up the back end and show the dashboard in a browser
- Set up image generation so the picture frame can refresh automatically
From Design to Implementation
Before we start this section, I probably won’t be able to show the code here—because, honestly, I haven’t written a single line of it myself. (If you want the code, just DM me.)
That said, I do understand what it’s doing. I read through what ChatGPT and Antigravity generated, and I can follow every function. I’d say I understand about 80% of it overall. The important part for me isn’t typing the code—it’s understanding why it’s written that way, which modules call which (kind of like a chain of command IRL), and what output each module is supposed to produce. That’s how I can track whether the AI is doing the right thing for me.
All in all, here’s the solution blueprint.
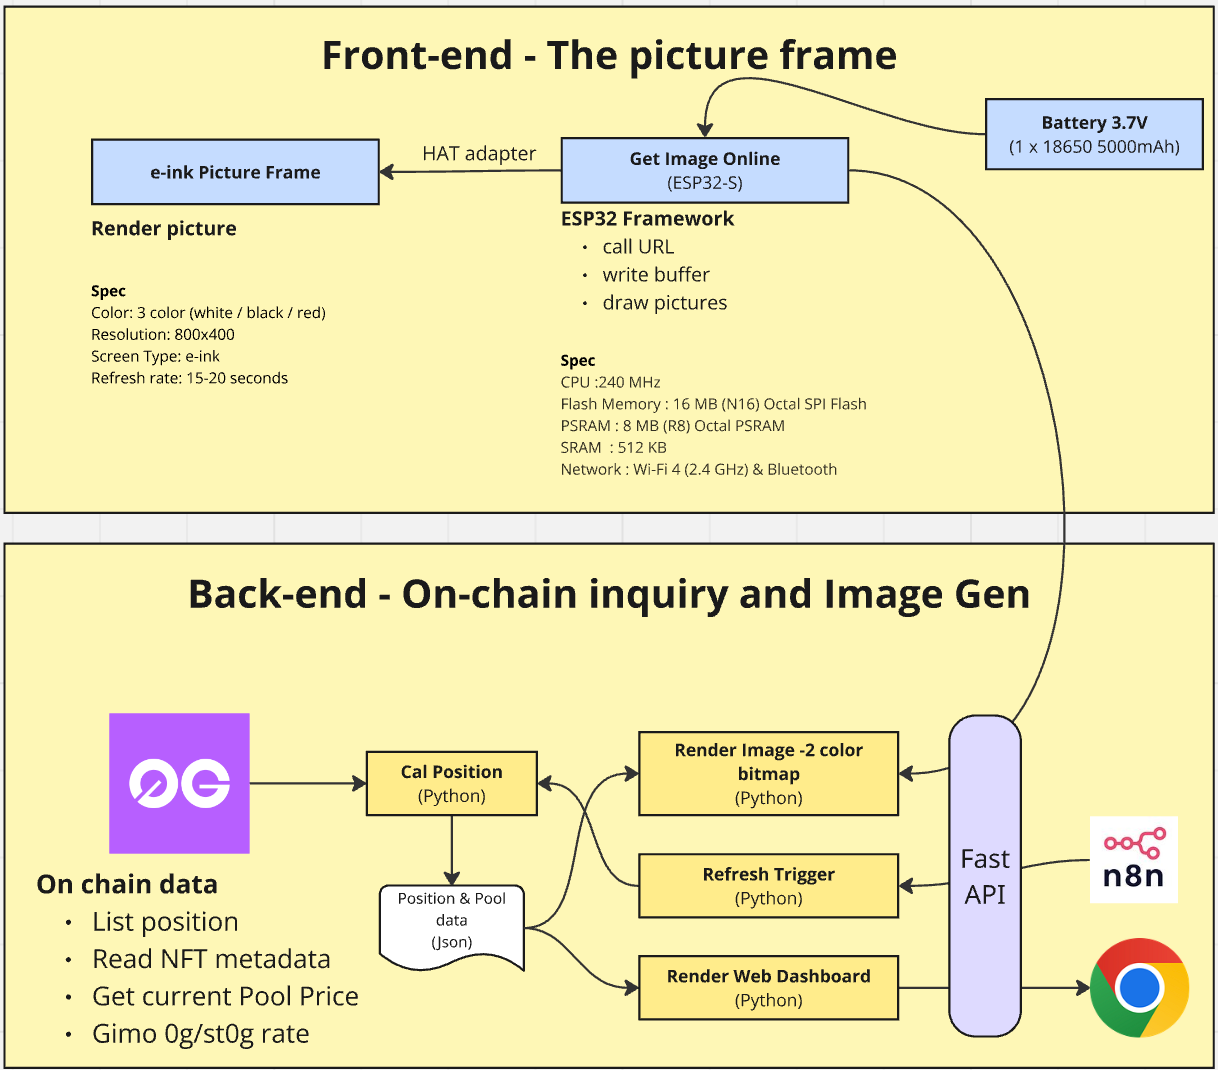
Back-end - On-Chain Inquiry and Image generation / presentation
Although this part looks really complex inside… honestly, writing this article (including drawing the picture above) took more time than letting AI do the work and getting the final result.
I was able to pull the data successfully in the first 10 minutes, then spent another 30+ minutes fine-tuning the output. So yeah—less than an hour total. Writing this article, though? Almost half a day.
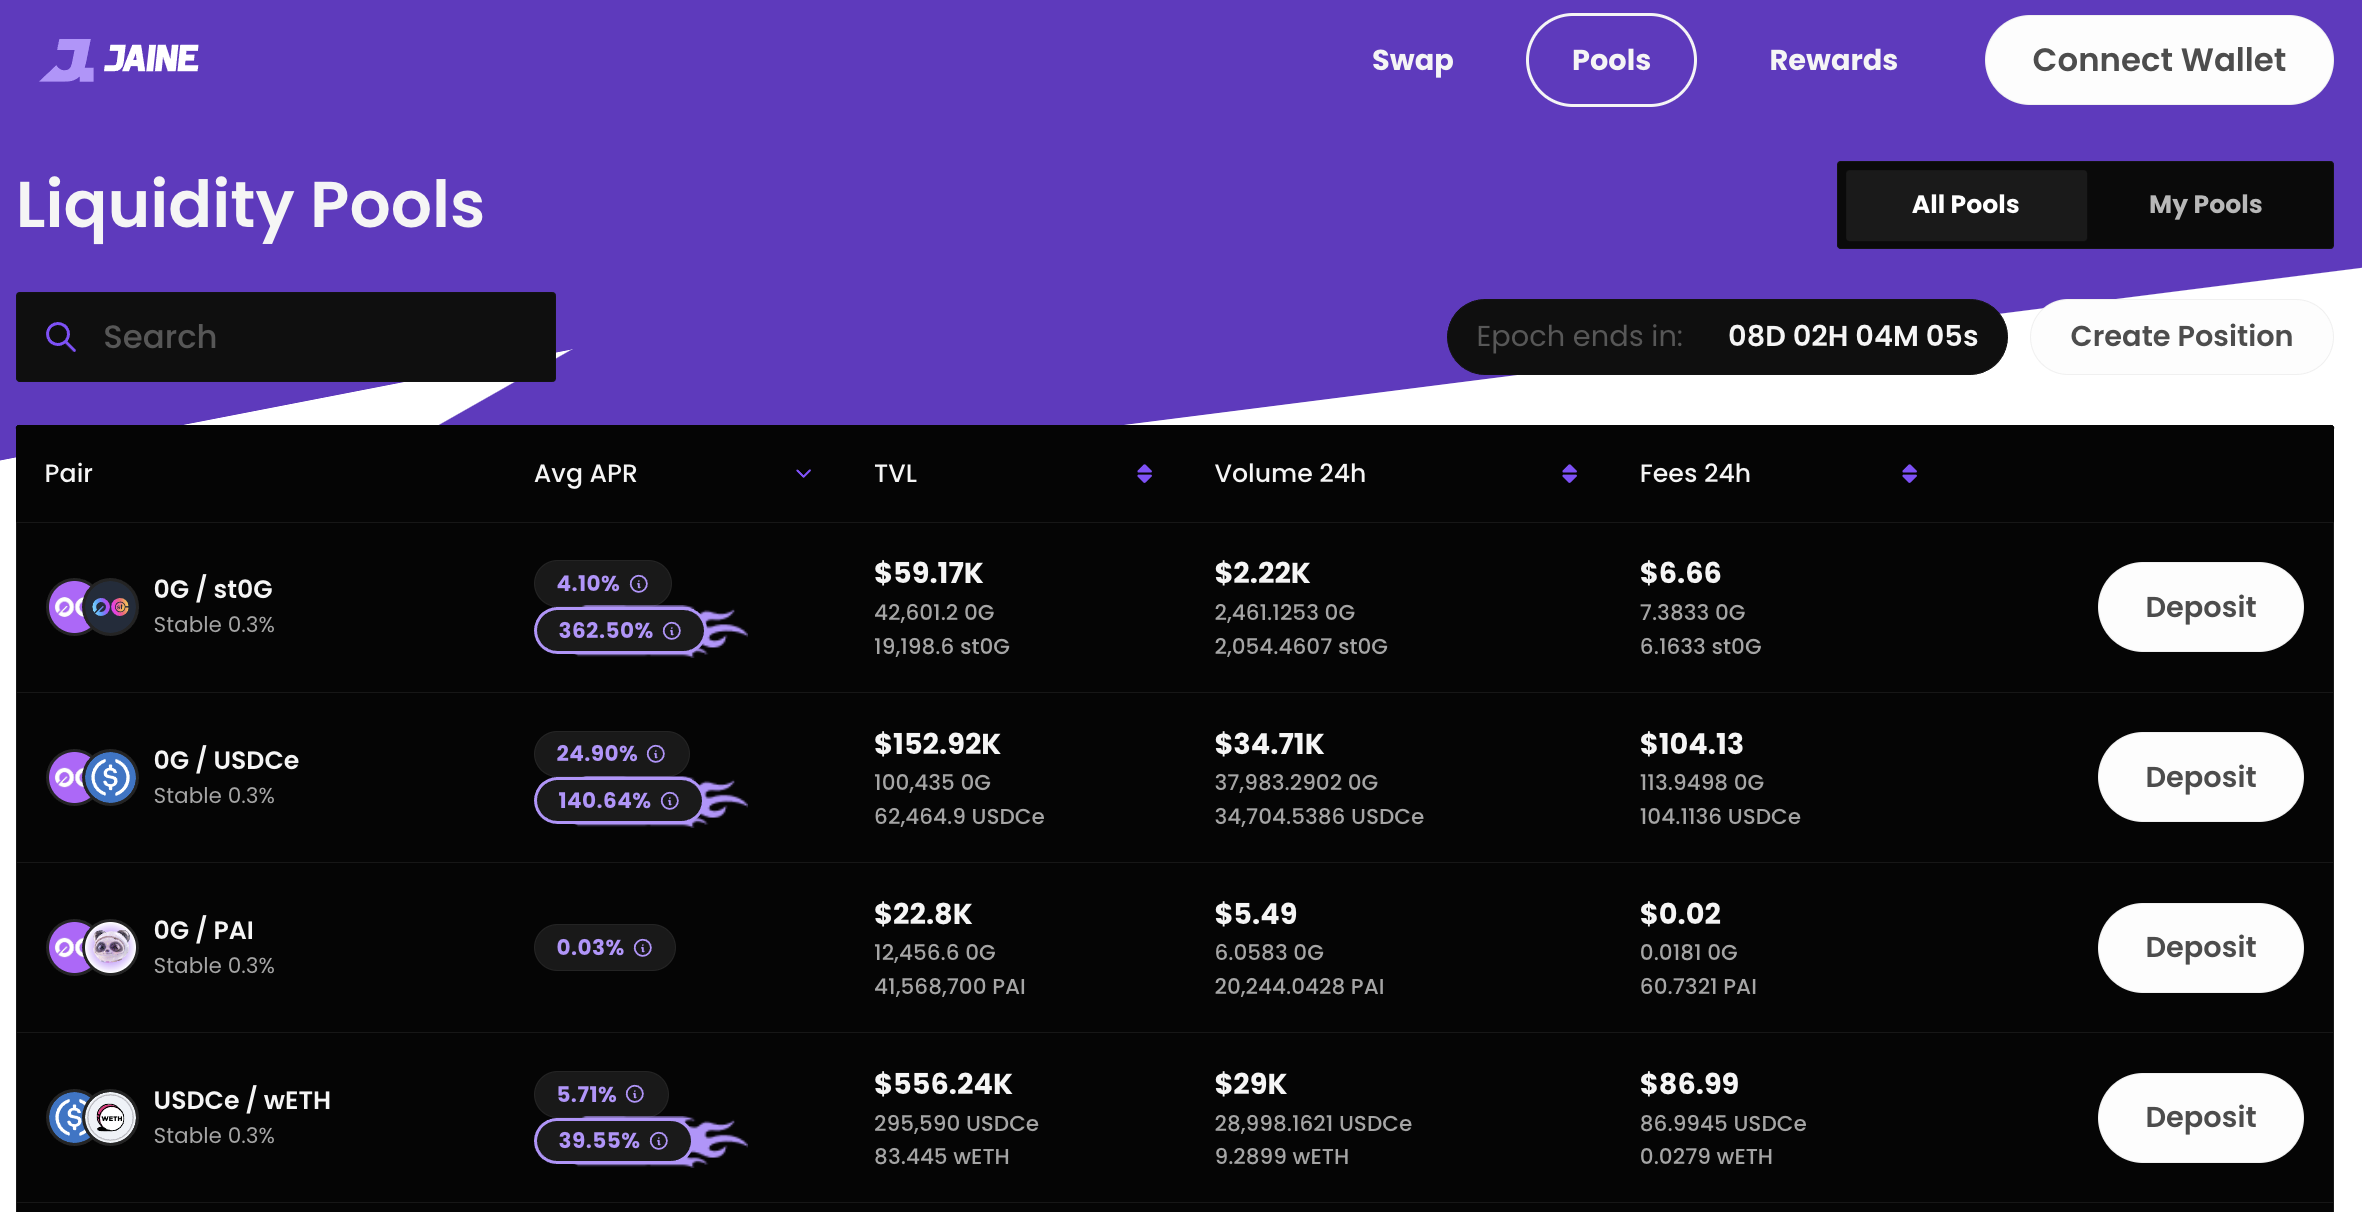
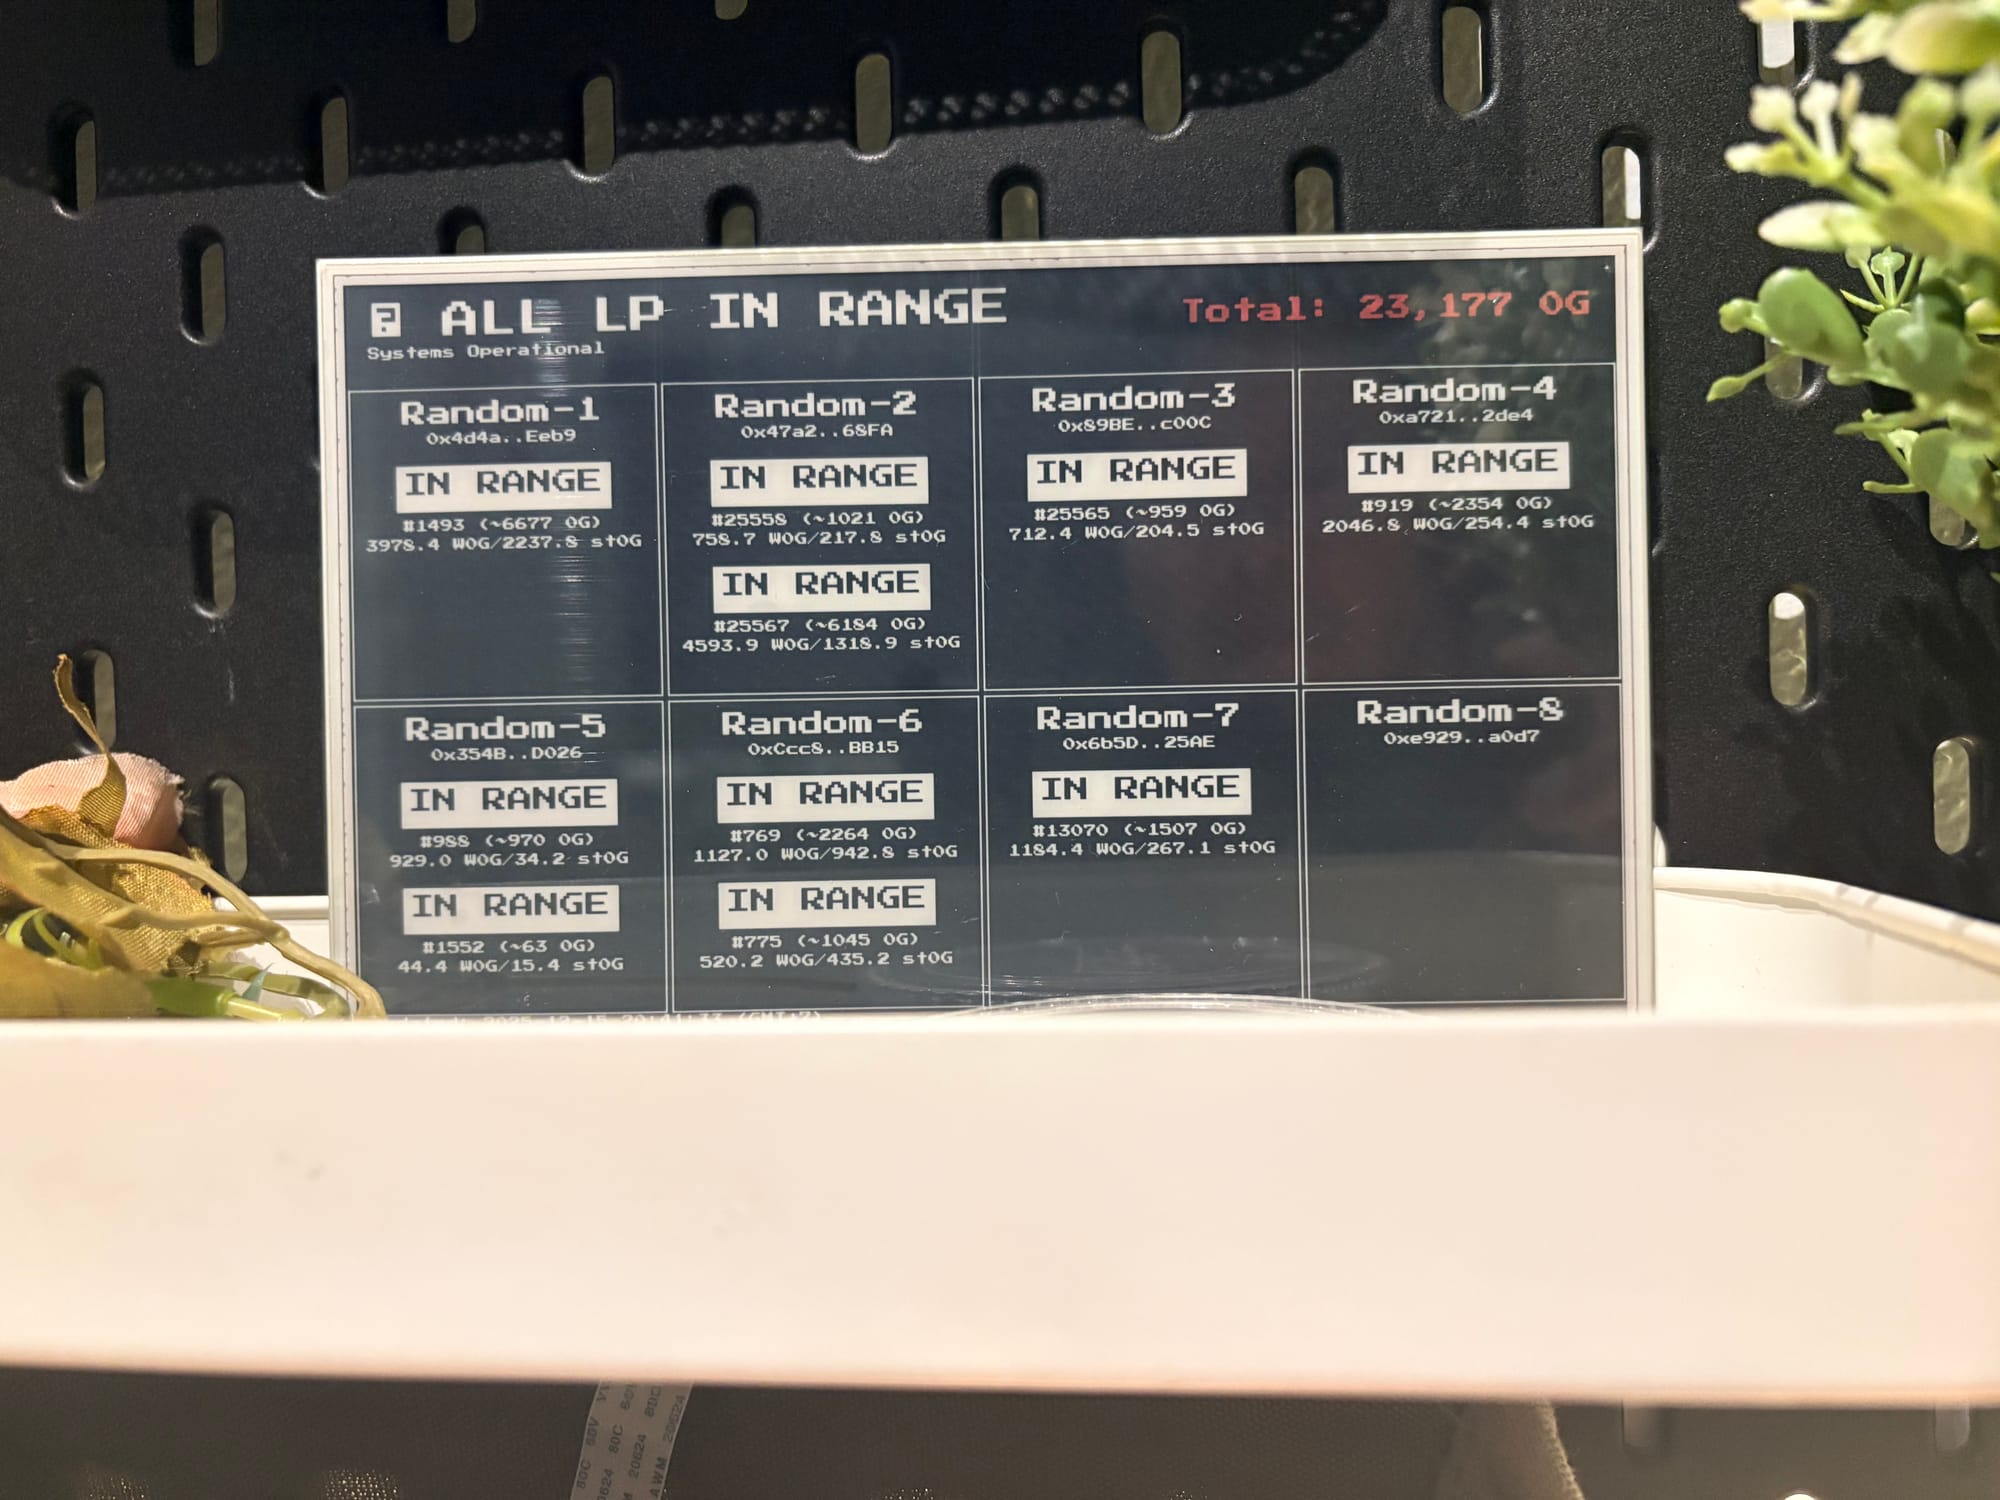
It all starts on the left with the “Raw Material” — the on-chain data. This is the truth, living on the blockchain. 0G is really fast and has a nice API available. It’s got everything: our position lists, NFT metadata, current prices, and the Gimo 0G/st0G rates. But raw data is messy and hard to read, right?
So we feed it into the yellow Cal Position box. This is a Python worker that talks to the blockchain, grabs all the numbers, calculates our actual positions, and organizes everything into clean, readable information.
Then it saves the result as a JSON file—a snapshot of exactly how we’re doing at that moment. I’m not storing it in a database yet, just to keep things simple for now.
Now this is where the factory starts assembling the final products. That same JSON gets used by three different modules:
- Render Image: This module reads the JSON and “paints” a low-res, 2-color bitmap designed specifically for the e-ink display. It’s basically analyzing the data, then turning it into pixels. And this is where you really feel the limits of ESP32 + e-ink. I can’t just tell it to draw an 800×400 image in one shot. The device is too lightweight for that.
So I split the image into two layer, black and red layer and I draw one layer at a time. That means it ends up producing two images.
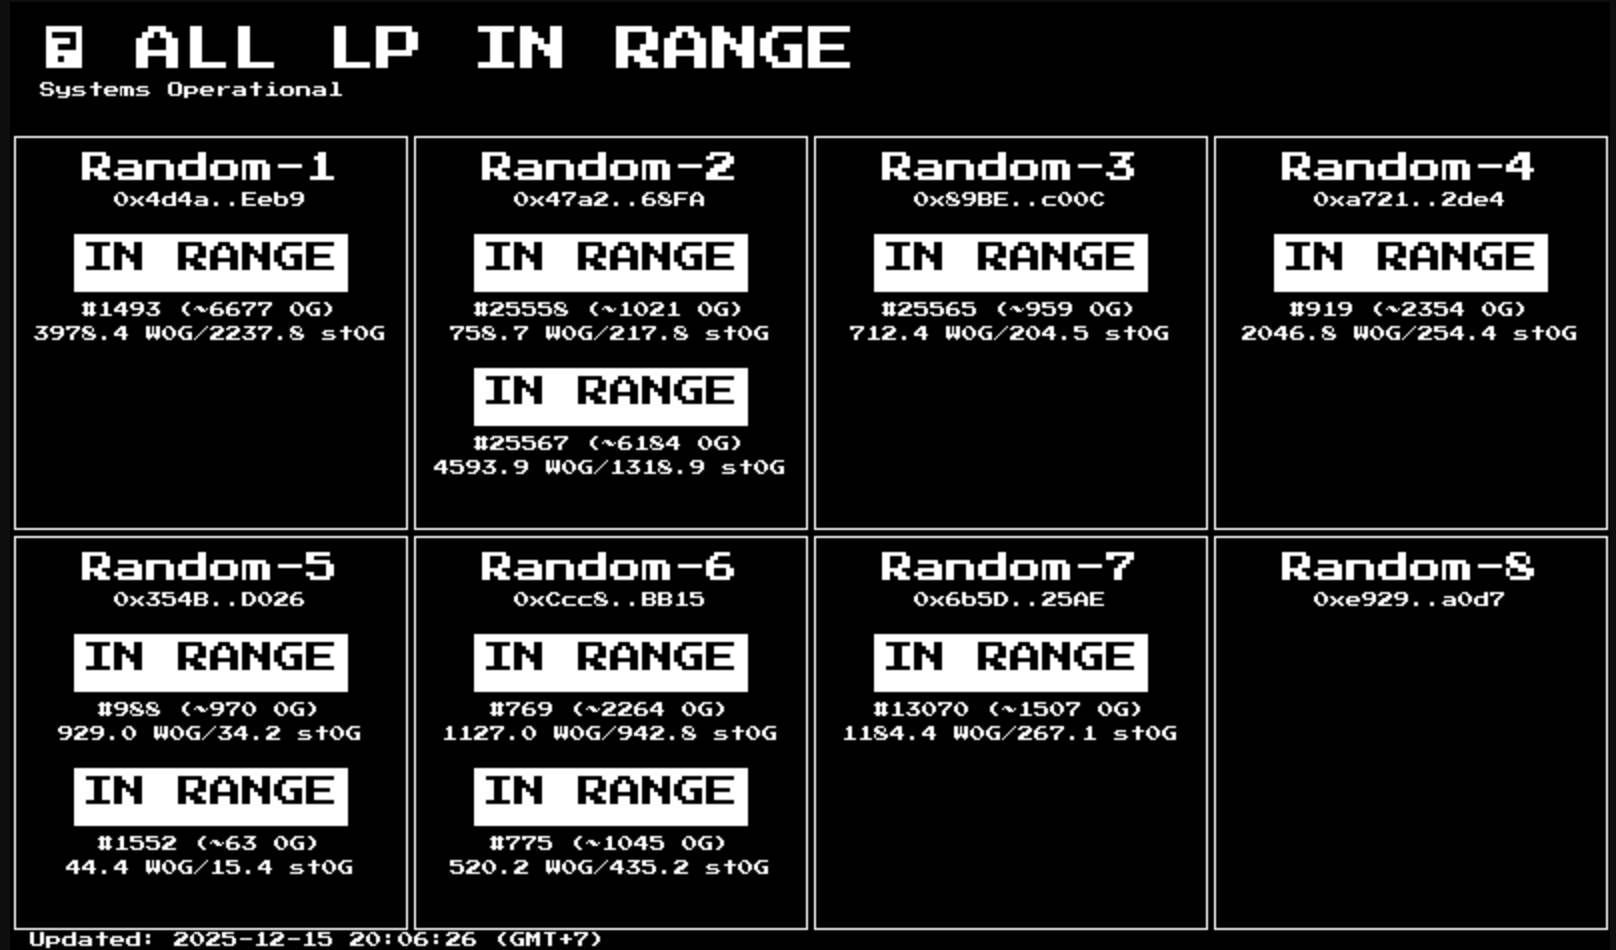
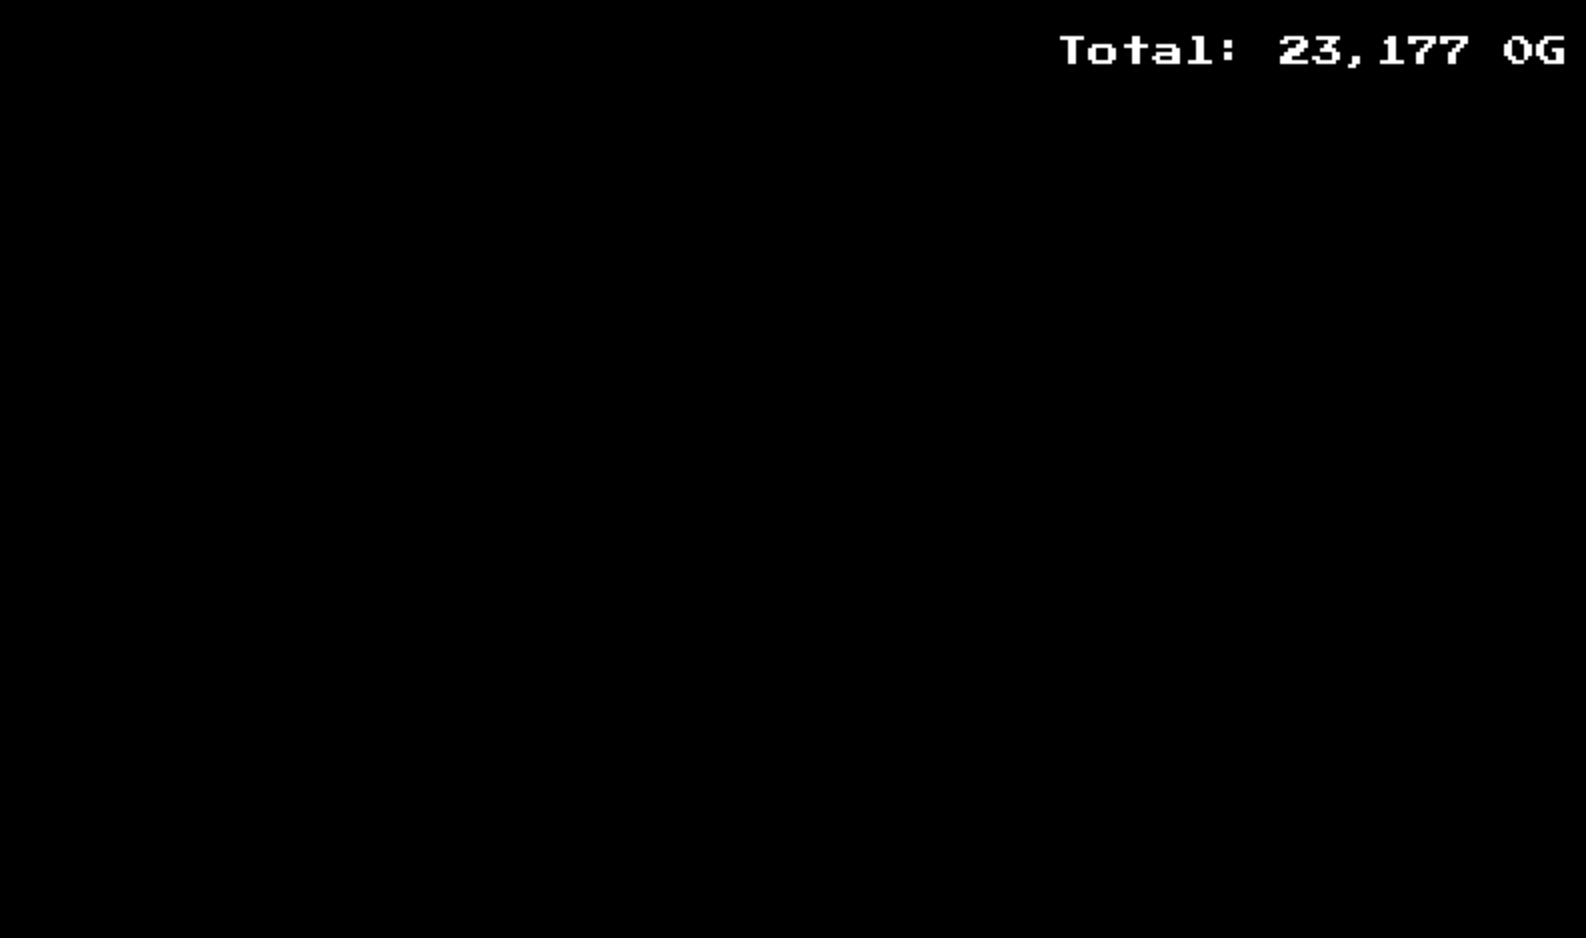
Left: Black Layer / Right: Red Layer
- Render Web Dashboard: This module takes the same data and builds a beautiful, colorful HTML page for the browser. It looks great and works perfectly on any web browser—but I didn’t stop there. The real goal is still the e-ink display.
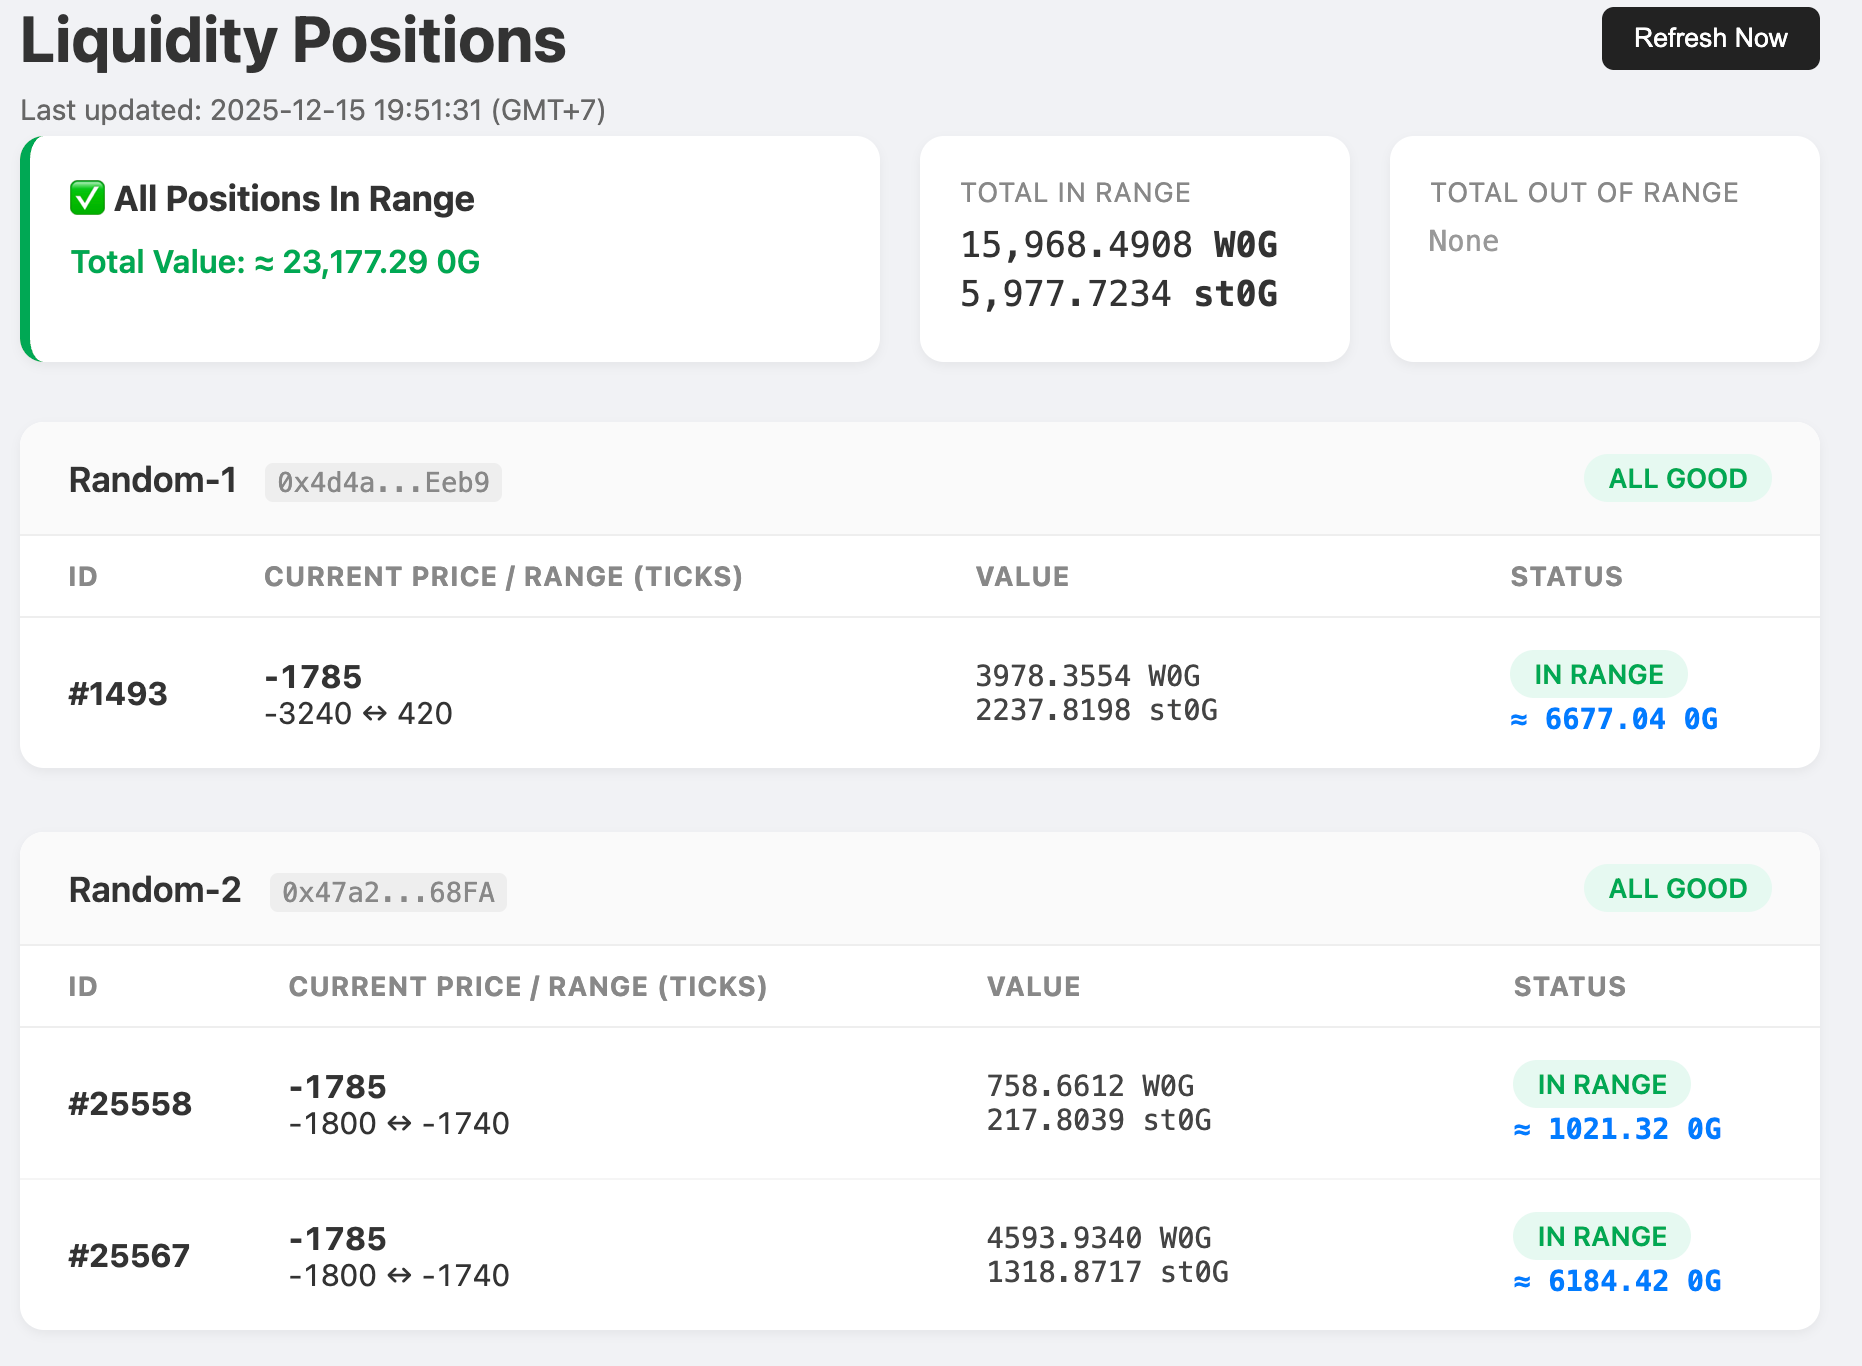
- Refresh Trigger: This part ensures the data doesn’t get stale. I use n8n to run a simple scheduled workflow that pulls fresh updates from the blockchain at regular intervals. If any positions are out of range, it sends a Telegram alert with details of the out-of-range pools.
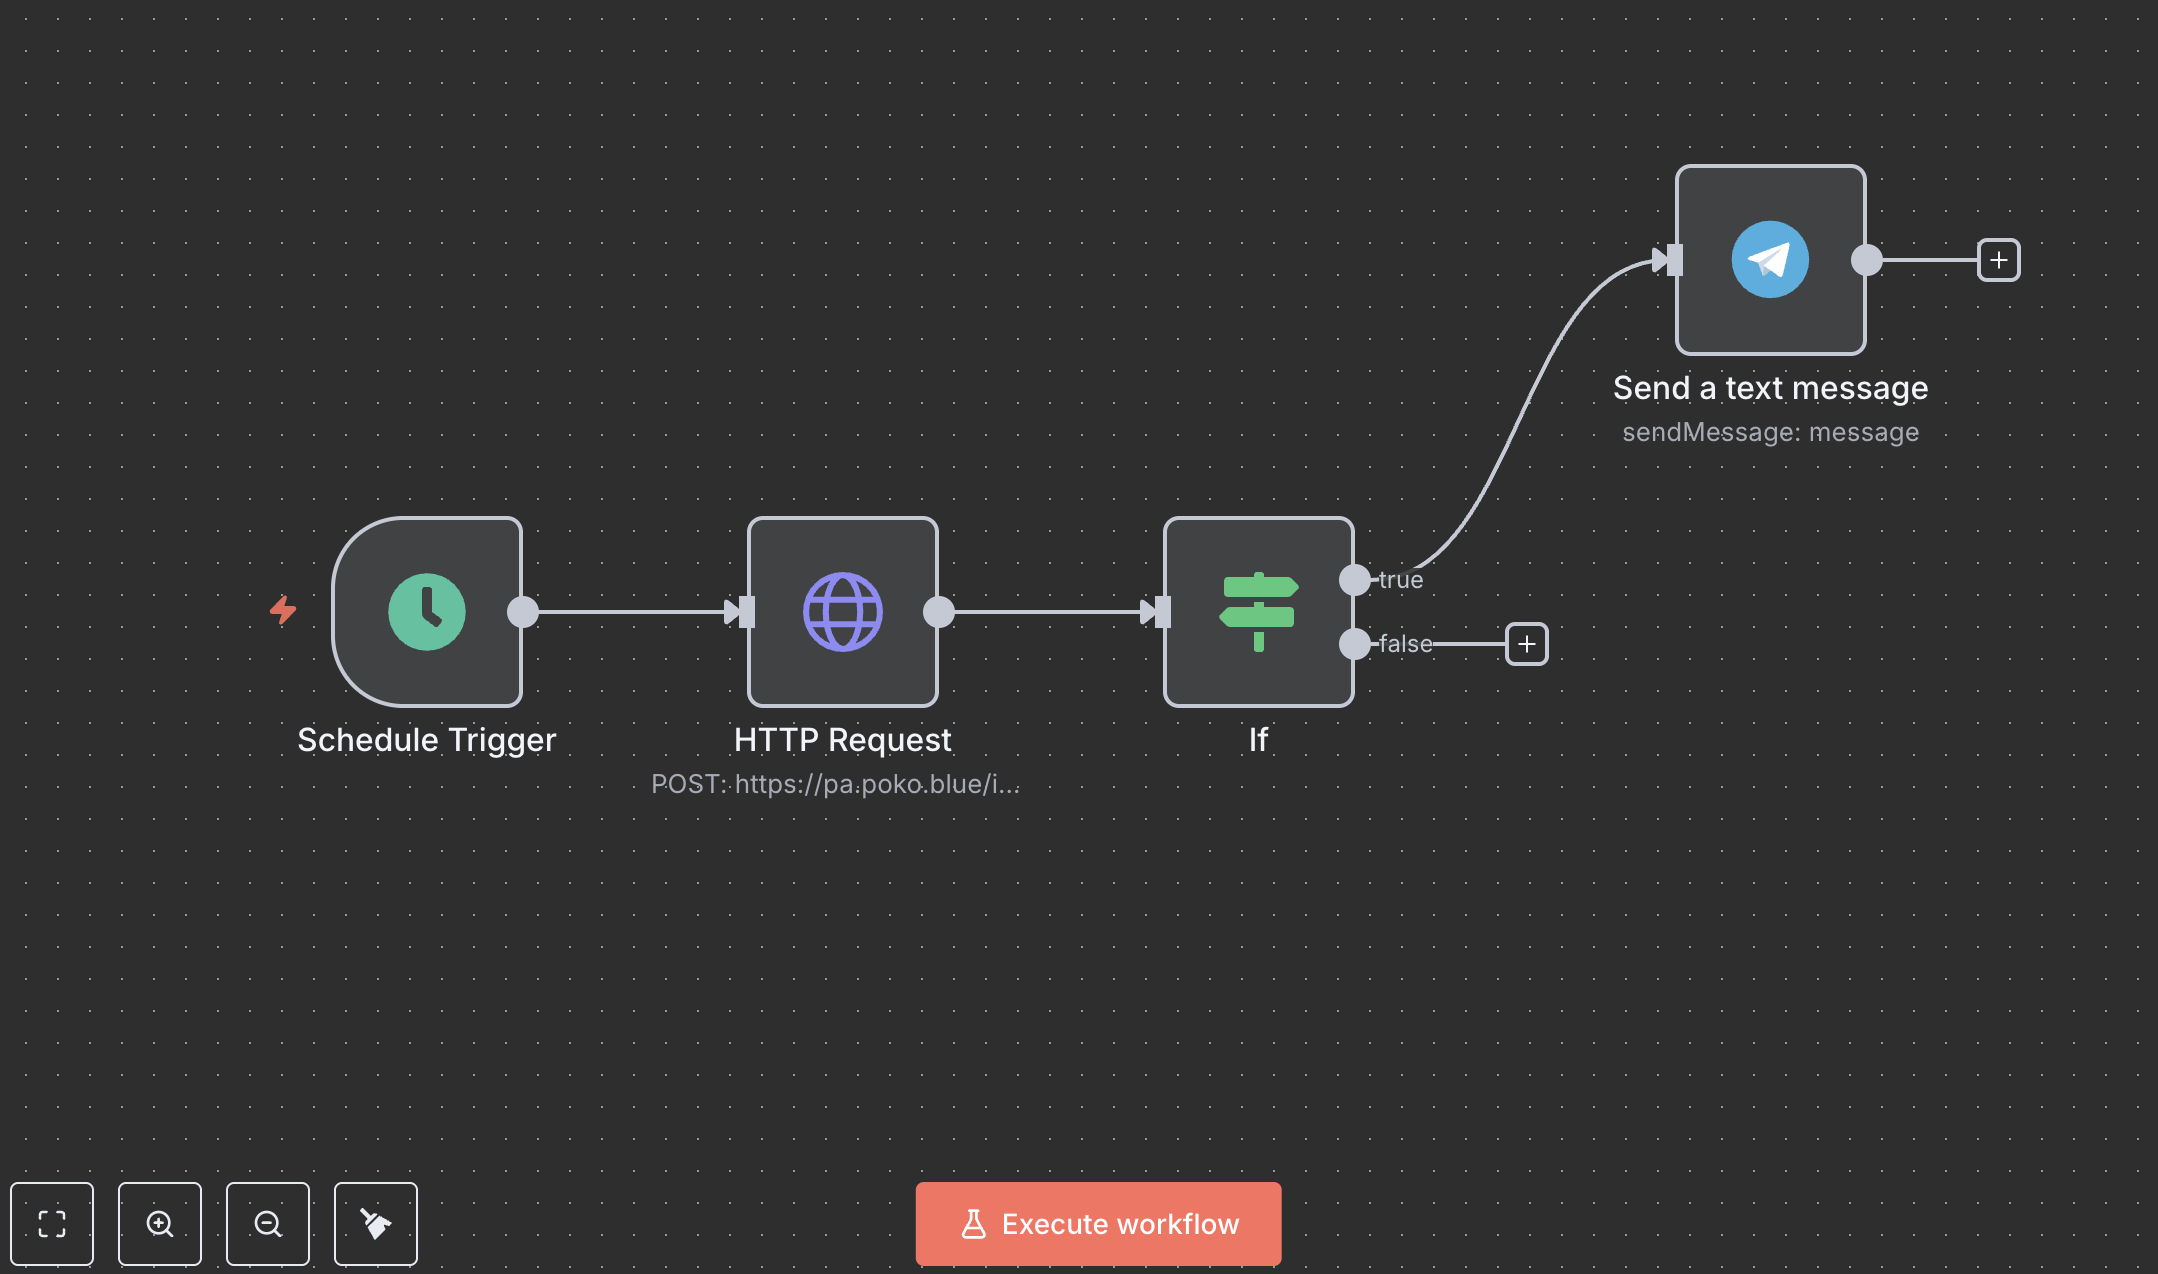
Finally, sitting in the middle of it all is the “Traffic Controller” — FastAPI. It’s the manager that takes requests from the outside world. It provides the endpoints that get called by the image renderer, the website, and n8n.
So in short: we pull raw chaos from the blockchain, crunch it into something organized, and then serve it up as either a fancy web page or a retro bitmap—everything coordinated by our FastAPI manager.
Pretty cool, right?
Front-end - Our thin client
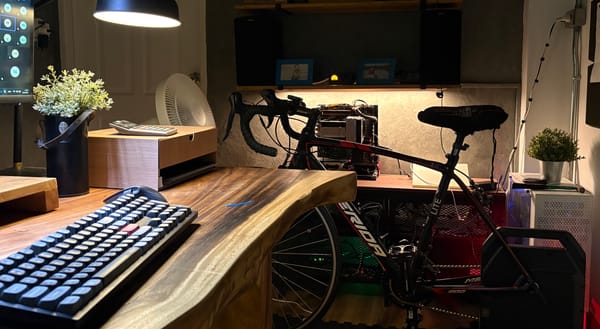
Okay, so we’ve seen the factory (the backend) where all the data gets crunched. Now let me introduce you to the “Picture Frame”—the actual thing sitting on my desk.
This is the part where AI can’t help that much, because I still have to do the real-world stuff: wiring, mapping cable, soldering, charging the battery, and all that. But it helped a lot by cutting down the searching and configuration time. Instead of hunting across random forums, it basically gave me the answers in one place.
There are three key components here:
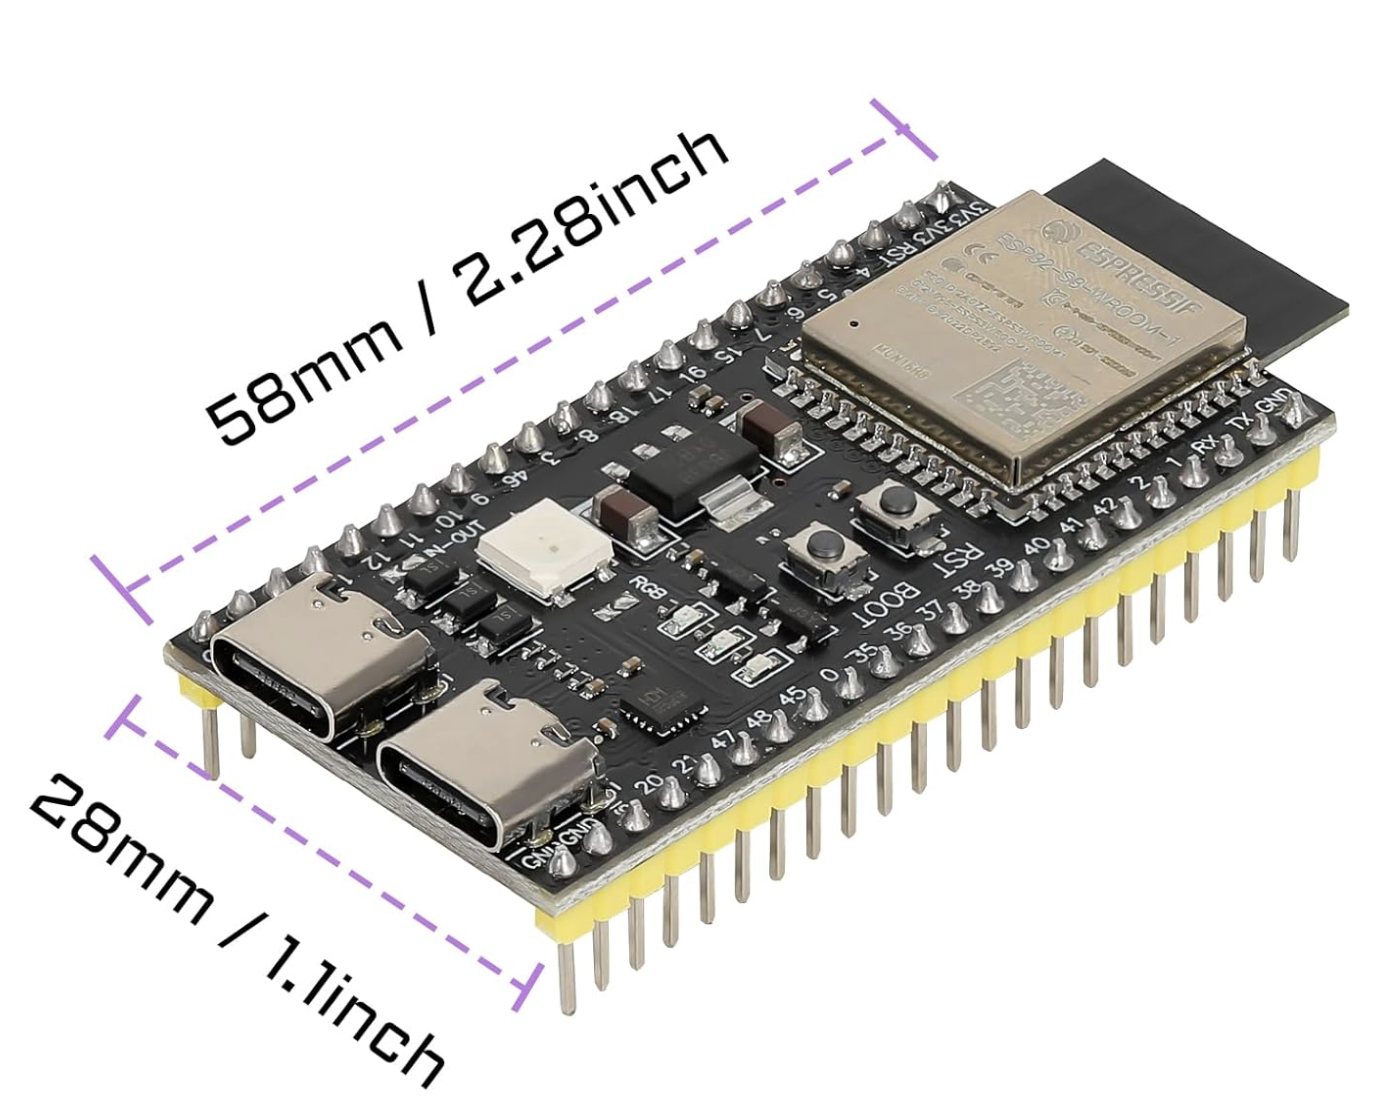
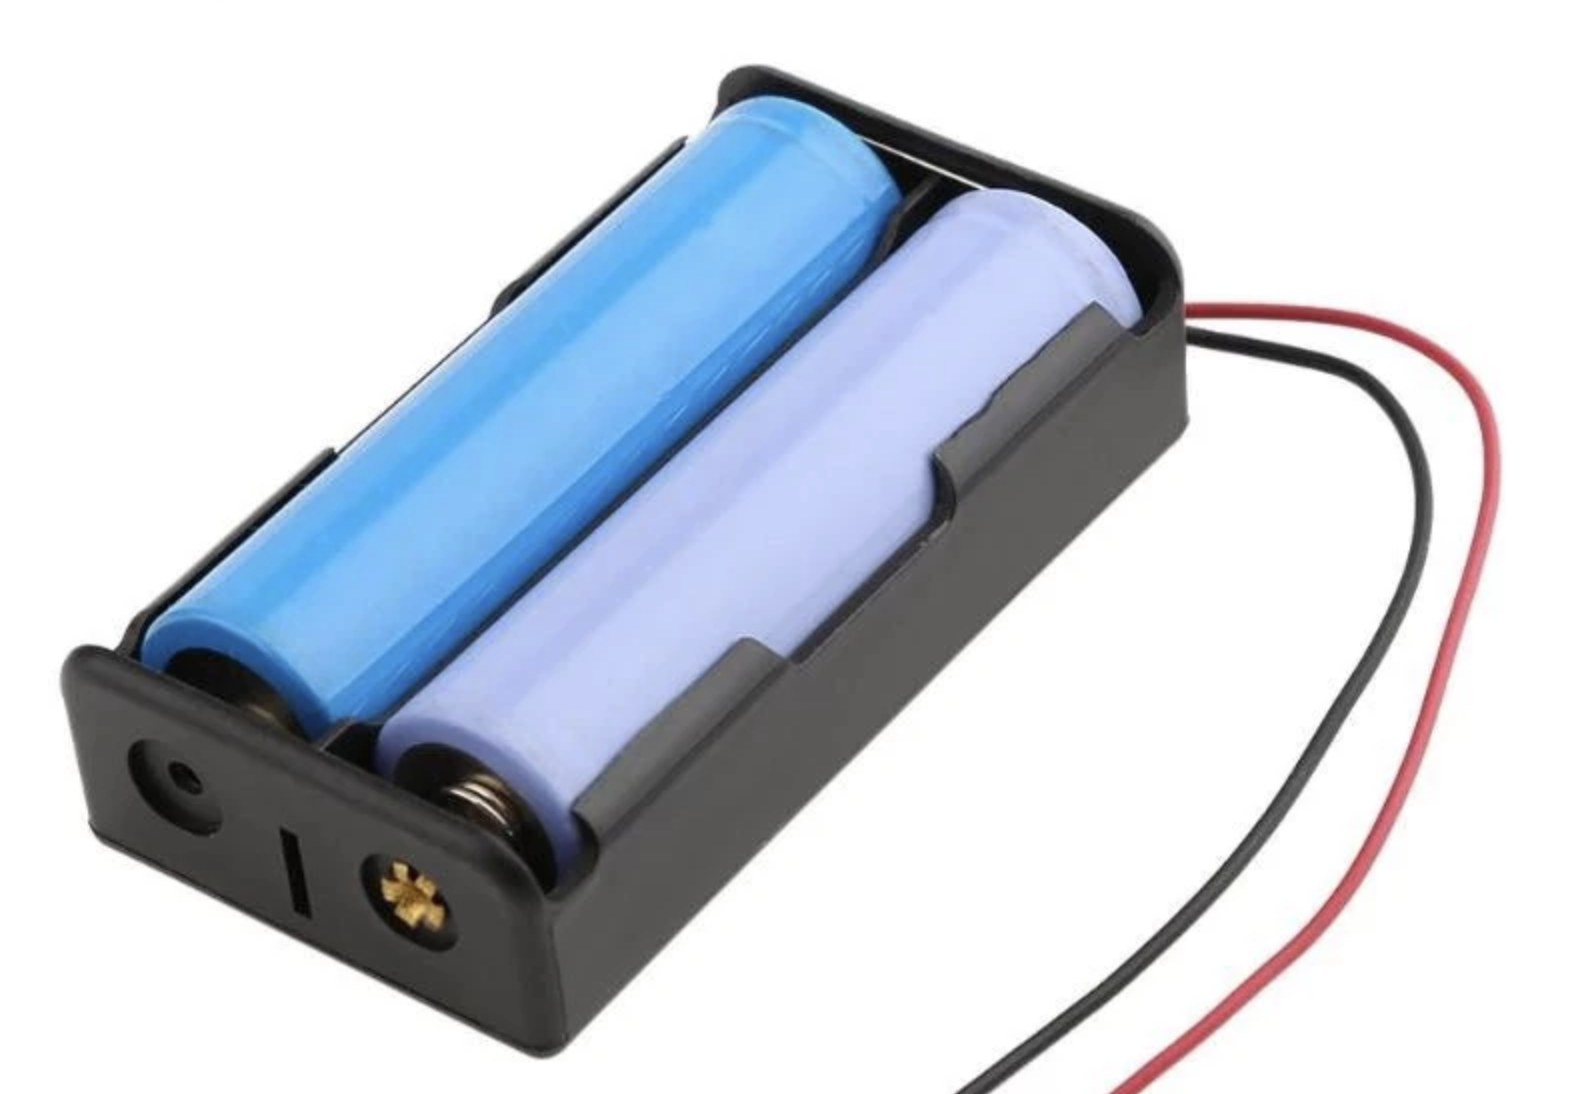
Left: ESP32-S3. Middle: e-Ink Display 7.5 inch. Right: 2x 18650 Battery
- ESP32-S3: If you’re not familiar with the ESP32, think of it like this: it’s a tiny computer (about half the size of an Oreo). It has a 240 MHz CPU, 8 MB RAM, a bit of storage, plus Wi-Fi and Bluetooth. And the best part is you don’t need to feed it 220V from the wall—it runs on a low-power 3.7V battery cell. Also… it costs less than 10 USD.
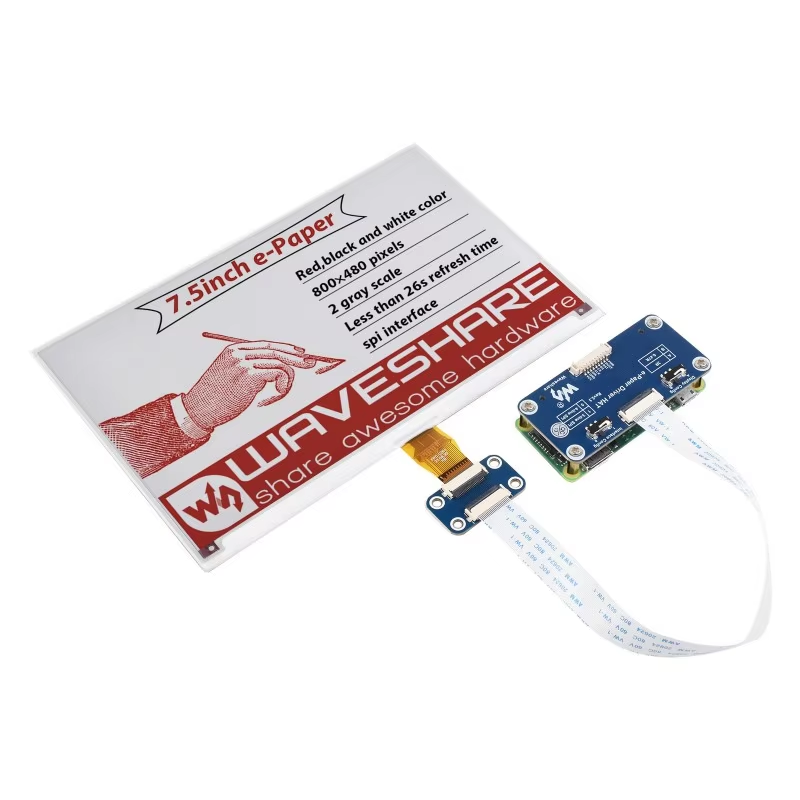
This chip is the clever little messenger. It connects to Wi-Fi and “calls” our backend. It basically asks, “Hey, do you have a new image for me?” Then it downloads the picture chunks (the buffers) and gets them ready for display. - The Canvas (E-ink Picture Frame): This is the star of the show. It’s not a glowing screen like your phone—it’s e-paper. You can’t read it after you turn off the light in bed. Not at all. It uses tiny micro-capsules of white, black, and red pigment. Mine cost around 50–70 USD.
The Magic: Once the image is drawn, it stays there forever without using power. It only needs energy to change the picture. The downside is the refresh rate is ridiculously slow—about 15–20 seconds for each draw. In my case, it took almost a minute to draw four small images. - The Power Plant (Battery): A standard 3.7V, 5000 mAh battery can power the whole thing. This cell is smaller in capacity compared to a typical phone battery, but the best part is we don’t need ugly cables running across the wall.
It powers the ESP32 to wake up, fetch the “art,” paint the canvas, and then go back to sleep. With this setup, it can last around 10–14 days. I’m expecting to charge it about once a week—and I’m totally happy with that.
So while the backend factory is working 24/7 crunching numbers, this frame acts like a quiet digital newspaper—waking up just long enough to “print” the latest edition in black, white, and red, then going silent again as it hangs on the wall.
The Final Output
It works, and I’m really happy with it.
Behind the scenes, though, the messy part is getting the ESP32 and the e-ink to work together. That could be a separate articleU by itself, but here’s the short version: most standard ESP32 models (WROOM, DevKit, etc.) don’t have enough RAM to handle e-ink rendering properly. I tried switching to 2-color mode (black and white) and it still didn’t work. I also tried chopping the image into smaller pieces—same result. The key is you need at least 8 MB RAM, which usually means going with one of the higher-end ESP32 models. Basically, we just pay a bit more— going from $5 to $10.
I also tried switching to a Raspberry Pi. It rendered the screen perfectly, but it didn’t match my design principles because it drains the battery too fast. It doesn’t really have a clean sleep-and-wake cycle, so it stays on all the time. One battery cell isn’t enough. If I wanted to keep it portable (no wiring), I’d need two battery cells (3.7V + 3.7V) and then step down to 5V to power the Pi. Even then, it only lasted about 24 hours (maybe 30 hours max) on two batteries.
I also plan to go camping near Mt. Fuji at the end of this year, so it would be awesome if this thing can travel with me. To make that happen, I’ll need a proper physical frame and Cloudflare Zero Trust Tunnel, so I can connect back to my home server from anywhere (I live in Thailand). That means it has to work in near-zero Celsius weather too.
So yeah—that’s the end of my story.
If you made it all the way here, thank you for reading. I just wanted to mash together my interests in crypto, coding, and ESP32 stuff (which is also part of my smart home setup). Hope you have an awesome weekend too. Bye for now.