My Journey Setting Up a Home Server: From Noob to …(not quite pro yet)…
A few months ago, I decided to set up a home server, and it turned into quite an adventure. It all started with an old notebook I had…

A few months ago, I decided to set up a home server to start running node, and it turned into quite an adventure. It all started with my gaming PC and old notebook I had lying around, and I thought, why not put it to good use?
This is just the opening introduction. In this article, I share my story and use it as a placeholder for my related articles. Every time I encounter something challenging, I write an article about it. Initially, I just took brief notes for myself so I could revisit them when needed. However, I think it would be more useful to share these experiences, so readers don’t have to go through the same trial and error as I did.
I began by installing Ubuntu 24.04 and setting up KVM for virtualization. To be honest, that was the first time I used Linux. I chatted with ChatGPT so much that I exceeded the quota rate limit many times a day. But it wasn’t that difficult, and I got my first Linux setup up and running.
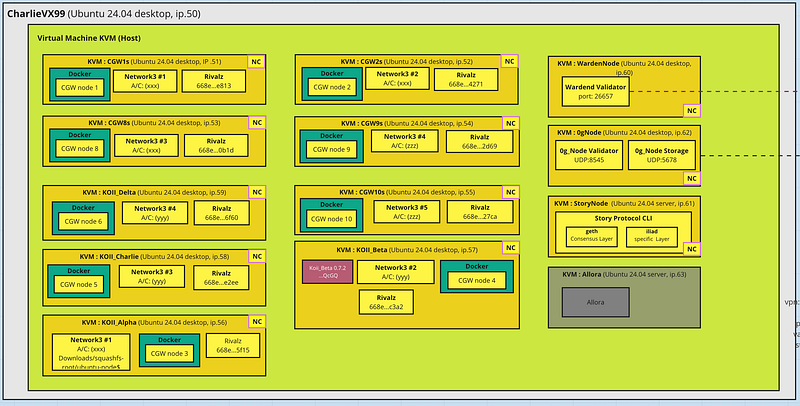
Then, I configured the network so that the guest virtual machines could communicate with each other. By default, they couldn’t communicate, and I didn’t know why, but I needed them to talk to each other.

Note: I recommend reading this entire story before diving deeper into each article.
Article 1:Getting Two KVM Guests on Different Host Machines to Communicate
Next, some Node projects required a fixed IP for peer synchronization. To secure a fixed IP address, I set up OpenVPN on a VPS. Since I only needed OpenVPN for this purpose, I chose the lowest-tier VPS, which was more than enough for this job.
Article 2: Don’t Have a Fixed IP at Home for Running a Node? A Step-by-Step Guide to Get It with a VPS
To optimize my node latency, I configured VPN tunnel splitting. This way, most of the networking traffic would go through my local network, but only the incoming peer synchronization would go through the VPN. Regarding the VPS location, I recommend finding a location where the majority of node runners are. Most of the time, this will be in the US, Central Europe, Dubai, or Korea. This will help minimize your packet latency. I still remember that was the most difficult part, since it required a lot of in-depth networking setup for me.

Article 3: How I optimize all 19 nodes with a VPN server (Split Tunnel)
As I became more comfortable with the setup, I gradually expanded my project. Little by little, things started to grow. I moved from the old notebook to reinstalling my working Windows 11 machine with Ubuntu 24.04 Desktop Version. It was a Ryzen 5500 8-core with 32 GB RAM. It wasn’t top-notch but better than my old laptop. On this computer, I could take care of my nodes seriously, and everything ran quite smoothly.
Eventually, I invested a bit over 350 USD in a dual-CPU motherboard, two 32-core CPUs (total 64 Core), 128 GB server-grade RAM (Max 512 GB), and a 1 TB NVMe drive. Suddenly, this setup was capable of handling numerous virtual machines with ease.

Surprisingly, my home fiber internet service is quite fast compared to average VPS options. I’m using AIS (a service provider in Thailand) with 2 Gbps/1 Gbps speeds, and it runs exceptionally smoothly. Then, upgrading to a 2.5 Gbps switch and wiring everything with LAN cables resulted in a remarkable boost in network performance.
As more computers joined the network, my collection of gadgets began to grow. I added an HDMI KVM switch, which helped a lot with cable management and made everything look neat. I even stumbled upon an old 7-inch screen, perfect for monitoring the system. It became an engaging and enjoyable project. However, the rainy season brought frequent power outages, so I decided to invest in a UPS to keep everything running smoothly.


I might have been convincing myself that this was a cost-effective solution. Realistically, it’s not quite true. To break even (compared to a VPS setup), it needs 8 to 12 months with a standard setup. The real expenses piled up with all the extra “toys” I couldn’t resist adding to my setup.
Maintenance was a bit challenging at the beginning since I was quite a noob at that time. However, it was not overly difficult, but it required consistent attention. Once everything stabilized, it became quite manageable. My frequent issue is running out of disk space on the VM or the host machine. Nodes tend to require more storage as the blockchain network expands.
Article 4: Node running out of space?
My key strategy was to keep the host machine as clean as possible, installing only KVM and SSH for remote access. That’s all, nothing more, nothing less. Then, each node operated as its own virtual machine, which kept the host system stable. If something broke, it was usually an individual VM rather than affecting the entire system. In worst-case scenarios, if my hardware failed, I could simply copy the VM images to another machine and click the start button to resume everything. For backups, I used large-capacity HDDs that didn’t need to be fast, just plenty of space (7200 RPM 4TB HDD).
Actually, my original plan was not to run servers at home, but something forced me onto this path. I got involved with running nodes for Gala Games (Townstar). I purchased 11 nodes when they were relatively inexpensive — in total, just a few hundred USD. However, I discovered later that they allowed only one node per machine. Splitting them across 11 VPS instances wasn’t practical; it was costly. So I opted to run them as virtual machines instead.
And so, that’s how I ended up with this extensive home server setup. It’s been quite a journey, filled with learning experiences and unexpected challenges. Despite the hurdles, it’s been incredibly rewarding, and I’ve gained a wealth of knowledge along the way.
Hope you enjoy my reading. Thank you.